【Latex】如何调整论文里面的多个子图?如何解决对齐问题?子图如何移动?
一、包含多个子图
要实现多个子图(subfigures)排列,我们需要使用浮动环境(如figure),并在其中放置子图。
浮动环境会自动管理页面的布局,并在需要时将内容移到新的页面上。
下面是一个示例代码,展示如何在LaTeX文档中创建多个子图:
\documentclass{article}
\usepackage{graphicx}
\usepackage{subcaption}

\begin{document}

\begin{figure}[!htb]
    \centering
    \begin{subfigure}{.5\textwidth}
        \centering
        \includegraphics[width=\linewidth]{example-image-a}
        \caption{First Subfigure}
    \end{subfigure}%
    \begin{subfigure}{.5\textwidth}
        \centering
        \includegraphics[width=\linewidth]{example-image-b}
        \caption{Second Subfigure}
    \end{subfigure}
    % 重复以上代码块来添加更多的子图
    \caption{Multiple Subfigures}
\end{figure}

\end{document}
在这个示例中,figure 环境包含了多个 subfigure,每个 subfigure 包含一个图像和一个标题。
如果所有子图无法放在同一页上,LaTeX 会自动将它们分散到新的页面上。我们可以根据需要调整子图的数量和布局。
如图所示:

二、对齐问题
LaTeX中的对齐问题通常是由于环境设置、图像本身的尺寸,或者是插入图像时周围的空白造成的。
要解决对齐问题,我们需要确保:
- 在所有的 subfigure 中使用相同的宽度设置。
- 确保图像的尺寸相匹配。
- 确保图像没有额外的边缘空白。
以下是一些建议修改,以解决对齐问题:
\begin{figure*}[!htb]
    \centering
    % 确保所有子图的宽度设置相同
    \includegraphics[width=\textwidth]{images/15.png}
    \includegraphics[width=\textwidth]{images/16.png}
    \includegraphics[width=\textwidth]{images/17.png}
    \includegraphics[width=\textwidth]{images/18.png}
    \includegraphics[width=\textwidth]{images/19.png}
    \includegraphics[width=\textwidth]{images/20.png}
    % 如果希望有子图的标题,每个includegraphics命令都应放在subfigure环境中,并且提供caption和label
\end{figure*}

\begin{figure*}[!htb]
    \centering
    % 使用相同的宽度设置
    \includegraphics[width=\textwidth]{images/21.png}
    \includegraphics[width=\textwidth]{images/22.png}
    \includegraphics[width=\textwidth]{images/23.png}
    \includegraphics[width=\textwidth]{images/24.png}
    \includegraphics[width=\textwidth]{images/25.png}
    \includegraphics[width=\textwidth]{images/26.png}
    % 如果希望有子图的标题,每个includegraphics命令都应放在subfigure环境中,并且提供caption和label
\end{figure*}
如果希望在图像下方添加子标题和标签,需要为每个 \includegraphics 命令包裹一个 subfigure 环境,并提供 \caption 和 \label。这里我移除了 subfigure 环境因为我们没有在原始代码中为它们添加标题。
请注意,如果图像自身的尺寸不一,或者它们有不同的边缘空白,这可能会导致图像在视觉上不对齐。我们可能需要预先编辑图像以确保它们的尺寸一致并且边缘空白最小化。
三、子图的移动
在LaTeX中,要将整个figure*环境内的内容稍微向右移动,可以使用\hspace{<length>}命令并给它一个正值。这个命令会在环境的左边添加一些水平空间,从而将内容向右移动。
我们可以在\begin{figure*}和\centering之间添加这个命令。
这里是如何修改代码:
\begin{figure*}[!htb]
    \centering
    \hspace{5mm} % 这会将图片整体向右移动5毫米,您可以根据需要调整这个值
    \includegraphics[width=\textwidth]{images/21.png}
    % 重复上面的命令来包括其他图像
\end{figure*}
请注意,如果我们的图像已经使用了\textwidth的宽度,那么向右移动可能会导致图像的一部分超出页面边缘。为了避免这种情况,可以适当地减小图像的宽度来为右移留出空间,例如:
\begin{figure*}[!htb]
    \centering
    \hspace{5mm} % 向右平移
    \includegraphics[width=0.95\textwidth]{images/21.png} % 减小宽度以避免内容溢出
    % 重复上面的命令来包括其他图像
\end{figure*}
但是这种方法后,我们发现只有第一张图片发生了平移。
直接使用 \hspace{} 没有产生变化,可能是因为 \centering 命令的作用,它会覆盖 \hspace{} 的效果。尝试移除 \centering 命令,并使用 \hspace{} 来调整位置。
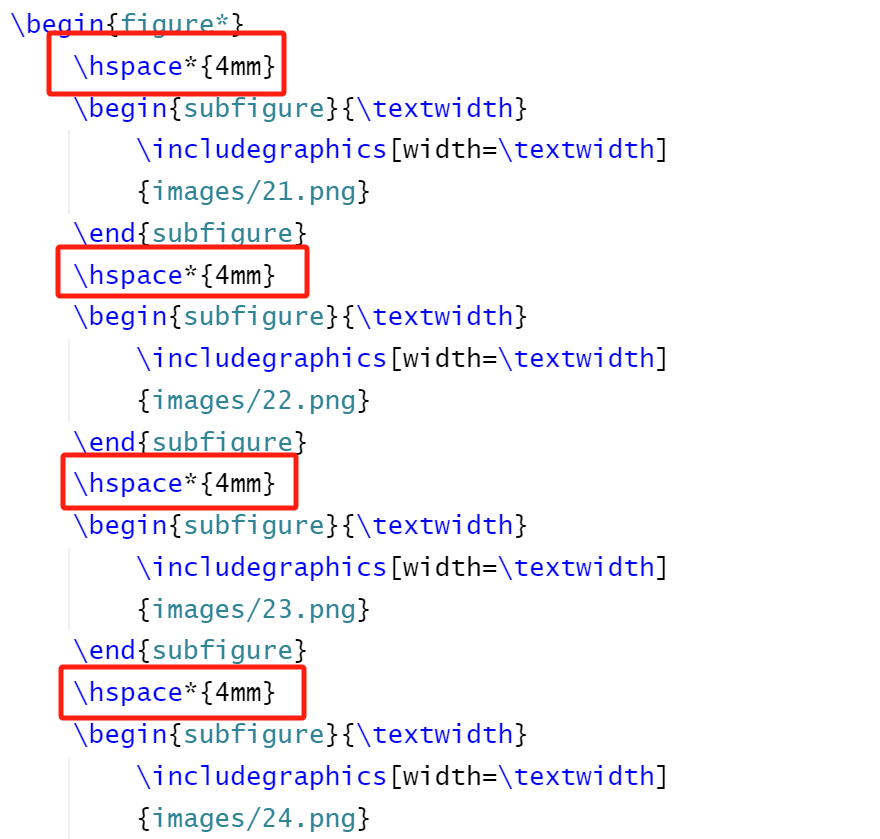
问题便得到了解决!