【SpringMVC】(3)浅谈前台往后台传参
【SpringMVC】(3)浅谈前台往后台传参
- 【一】基本介绍
- 【二】分析URL的概念和组成
- 【三】SpringMVC的注解
- 【四】常用注解总结
- 【五】常用的传参案例
- 【六】Restful风格案例
- 【七】结合前端的传参案例
【一】基本介绍
前台往后台发送请求的时候,往往需要同时传递参数,用Controller控制器接收,这样控制器才能对参数进行处理。
- RESTful风格:把参数写到请求路径中,而不是以HTTP请求参数
- JSON:比如查询用户的时候,需要分页,可能用户的信息非常多,那么查询参数可能有数十个,显然一个个传参很麻烦,那就把这些参数组装成一个JSON数据集,而把分页参数作为普通参数传递,然后再把数据传递给后台
【二】分析URL的概念和组成
【1】概念
(1)url的概念
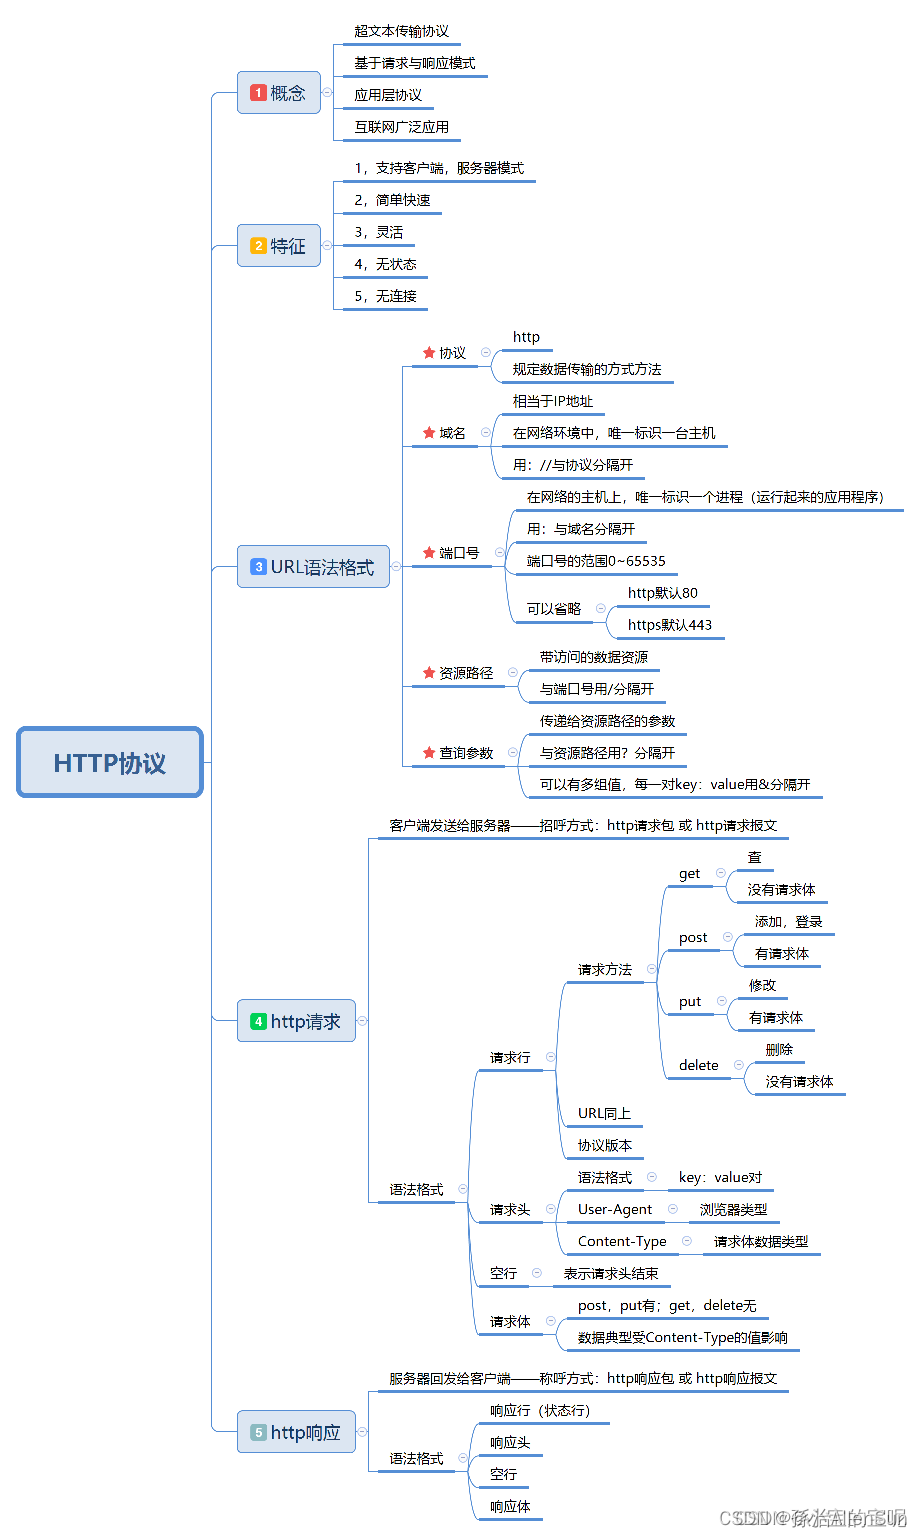
Internet上的每一个网页都具有一个唯一的名称标识,通常称之为URL(Uniform Resource Locator, 统一资源定位器)。
它是www的统一资源定位标志,简单地说URL就是web地址,俗称“网址”。
(2)url的组成
(1)URL由三部分组成
资源类型、存放资源的主机域名、资源文件名
(2)也可认为由4部分组成
协议、主机、端口、路径。(很多时候端口都是隐藏的)
(3)还可以认为由7部分组成
协议,域名,端口,虚拟目录,文件名,锚,参数
【2】特征
【3】URL语法格式
(1)URL的一般语法格式
protocol 😕/ hostname[:port] / path / [;parameters][?query]#fragment
(带方括号[]的为可选项)
(2)案例说明
(1)协议、主机、端口、路径
https://blog.csdn.net/weixin_53436351?spm=1011.2124.3001.5343
- 协议(HTTP):规定数据传输的方式
- 域名(IP):在网络环境中找到主机-------用 😕/ 与协议分隔开
- 端口(port):(常省略)在网络主机上,标识一个进程(应用程序)------用 : 与域名分隔开
- 资源路径:标识网络资源(文件,图片,音视频,变量…)------用 😕/ 与端口分隔开
- 查询参数:传递给资源路径对应的数据------用 ? 与资源路径分隔开,查询内部参数用 & 分隔多个键值对
(2)协议,域名,端口,虚拟目录,文件名,锚,参数
protocol 😕/ hostname[:port] / path / [;parameters][?query]#fragment
- 协议protocol:一般为http或https
- 域名hostname:一个URL中,也可以使用IP地址作为域名使用
- 端口port:跟在域名后面的是端口,域名和端口之间使用“:”作为分隔符。
端口不是一个URL必须的部分,如果省略端口部分,将采用默认端口
- 虚拟目录path:从域名后的第一个“/”开始到最后一个“/”为止,是虚拟目录部分
虚拟目录也不是一个URL必须的部分
- 文件名;parameters:从域名后的最后一个“/”开始到“?”为止,是文件名部分,如果没有“?”,则是从域名后的最后一个“/”开始到“#”为止,是文件部分,如果没有“?”和“#”,那么从域名后的最后一个“/”开始到结束,都是文件名部分。
文件名部分也不是一个URL必须的部分,如果省略该部分,则使用默认的文件名
- 锚fragment:从“#”开始到最后,都是锚部分。
锚部分也不是一个URL必须的部分
- 参数query:从“?”开始到“#”为止之间的部分为参数部分,又称搜索部分、查询部分。参数可以允许有多个参数,参数与参数之间用“&”作为分隔符。
注意: URL 只能使用 ASCII 字符集来通过因特网进行发送。 也就是说URL只能使用英文字母、阿拉伯数字和某些标点符号,不能使用其他文字和符号 。
【4】http请求
【5】http响应
【三】SpringMVC的注解
【1】@RequestMapping
Spring MVC 通过 @RequestMapping 注解将 URL 请求与业务方法进行映射,在控制器的类定义处以及方法定义处都可以添加 @RequestMapping,在类定义处添加相当于多了一层访问路径。
@Controller
@RequestMapping("/hello")
public class HelloHandler {

    @RequestMapping("/index")
    public String index(){
        System.out.println("接收到请求了");
        return "index";
    }
}
访问路径:http://localhost:8080/hello/index
@RequestMapping 常用参数
(1)value:指定 URL 请求的实际地址,是 @RequestMapping 的默认值
(2)method:指定请求的 method 类型,包括 GET、POST、PUT、DELETE 等。
@Controller
@RequestMapping("/hello")
public class HelloHandler {

    @RequestMapping(value = "/index",method = RequestMethod.POST)
    public String index(){
        System.out.println("接收到请求了");
        return "index";
    }
}
上述代码表示只有 POST 请求可以访问该方法,若使用其他请求访问,直接抛出异常,比如 GET。
(3)params:指定 request 请求中必须包含的参数值,若不包含,无法调用该方法。
@Controller
@RequestMapping("/hello")
public class HelloHandler {

    @RequestMapping(value = "/index",method = RequestMethod.POST,params = {"id=1", "name=tom"})
    public String index(){
        System.out.println("接收到请求了");
        return "index";
    }
}
上述代码啊表示 request 请求中必须包含 name 和 id 两个参数,并且 id 的值必须为1,name 的值必须为tom,才可调用,否则抛出 400 异常。
访问路径为:http://localhost:8080/hello/index?id=1&name=tom
【2】@RequestParam 参数绑定
如果需要在业务方法中获取 URL 的参数值,可以使用 @RequestParam 注解
(1)在业务方法定义时声明参数列表
(2)给参数列表添加 @RequestParam 注解进行绑定
@Controller
@RequestMapping("/hello")
public class HelloHandler {

    @RequestMapping(value = "/index",method = RequestMethod.POST)
    public String index(@RequestParam("num") Integer id,@RequestParam("str") String name){
        System.out.println("接收到请求了,参数是:id=" + id + ",name=" + name);
        return "index";
    }
}
请求路径:http://localhost:8080/hello/index?num=1&str=tom
输出结果:接收到请求了,参数是:id=1,name=tom
Spring MVC 可以自动完成数据类型转换,该工作是由 HandlerAdapter 来完成的。
【3】@RequestBody
@RequestBody可以获取请求体,需要在控制器方法设置一个形参,使用@RequestBody进行标识,当前请求的请求体就会为当前注解所标识的形参赋值
<form th:action="@{/testRequestBody}" method="post">
    用户名:<input type="text" name="username"><br>
    密码:<input type="password" name="password"><br>
    <input type="submit">
</form>
@RequestMapping("/testRequestBody")
public String testRequestBody(@RequestBody String requestBody){
    System.out.println("requestBody:"+requestBody);
    return "success";
}
/*输出结果:
requestBody:username=admin&password=123456
*/
【4】@PathVariable:Spring MVC 支持 RESTful 风格的 URL 参数获取
传统的 URL:http://localhost:8080/hello/index?num=1&str=tom
RESTful URL:http://localhost:8080/hello/index/1/tom
@RequestMapping("/restful/{id}/{name}")
public String restful(@PathVariable("id") Integer id, @PathVariable("name") String name){
   System.out.println(id + "-" + name);
   return "index";
}
通过 @PathVariable 可以将 URL 中占位符参数绑定到控制器处理方法的入参中。
【5】映射Cookie
@CookieValue的作用:用来获取Cookie中的值
@RequestMapping("/cookie")
public String getCookie(@CookieValue("JSESSIONID") String sessionId){
     System.out.println(sessionId);
     return "index";
}
输出结果:895AB5BA04AB4B038DDD859151C84C18
【6】使用 POJO 绑定参数
Spring MVC 会根据请求参数名和 POJO 属性名进行匹配,自动为该对象填充属性值,并且支持属性级联。
(1)创建实体类User:
package com.southwind.pojo;

import lombok.Data;

@Data
public class User {
    private Integer id;
    private String name;
    private Address address;
}
(2)创建 Address 试题列:
package com.southwind.pojo;

import lombok.Data;

@Data
public class Address {
    private Integer code;
    private String name;
}
(3)创建 addUser.jsp
<%--
  Created by IntelliJ IDEA.
  User: liquanpeng
  Date: 2021/12/16
  Time: 10:35 下午
  To change this template use File | Settings | File Templates.
--%>
<%@ page contentType="text/html;charset=UTF-8" language="java" %>
<html>
<head>
    <title>Title</title>
</head>
<body>
<form action="/hello/add" method="post">
    <table>
        <tr>
            <td>编号:</td>
            <td><input type="text" name="id"></td>
        </tr>
        <tr>
            <td>姓名:</td>
            <td>
                <input type="text" name="name">
            </td>
        </tr>
        <tr>
            <td>地址编号:</td>
            <td>
                <input type="text" name="address.code">
            </td>
        </tr>
        <tr>
            <td>地址信息:</td>
            <td>
                <input type="text" name="address.name">
            </td>
        </tr>
        <tr>
            <td>
                <input type="submit" value="提交">
            </td>
        </tr>
    </table>
</form>
</body>
</html>
(4)Handler:
@RequestMapping("/add")
public String add(User user){
    System.out.println(user);
    return "index";
}
(5)页面录入:
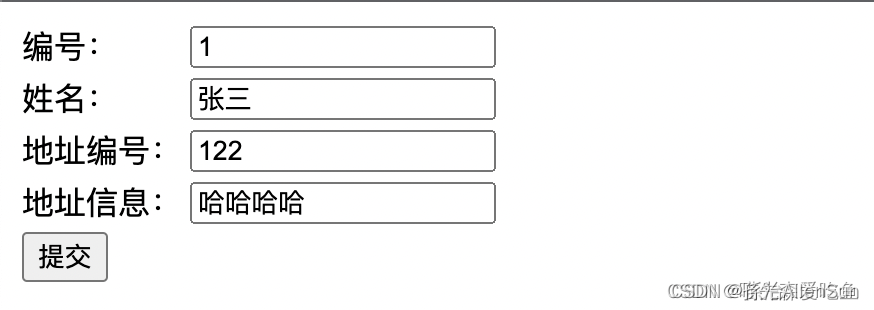
(6)输出结果

【四】常用注解总结
【1】@RequestParam的使用
主要用于将请求参数区域的数据映射到控制层方法的参数上【// http://localhost:8080/wh/user/edit?Id=9452659856325148452&name=天天向上
】
(1)@RequestParam源码
// @RequestParam源码

@Target({ElementType.PARAMETER}) // 只能作用于参数上
@Retention(RetentionPolicy.RUNTIME)
@Documented
public @interface RequestParam {
     // 定义参数名称,默认和名字一致
    @AliasFor("name")
    String value() default "";
    // 定义参数名称,默认和名字一致
    @AliasFor("value")
    String name() default "";
    // 默认必填,一旦加上该注解,前台必须传递此参数
    boolean required() default true;
    // 定义默认值
    String defaultValue() default "\n\t\t\n\t\t\n\ue000\ue001\ue002\n\t\t\t\t\n";
}
@RequestParam有三个配置参数:
(1)required:表示是否必传,默认为 true(可省略不写)。
(2)defaultValue:可设置请求参数的默认值(可省略不写)。
(3)value:为接收url的参数名(一般与接收参数名相同)。
(2)@RequestParam加与不加的区别
// userType非必传
@GetMapping("/userList1")
@ApiOperation(value = "获取所有账号")
public ApiResult<List<SysUserVO>> getUserList(Integer userType) {
    return ApiResult.data(userService.getUserList(userType));
}

// userType非必传
@GetMapping("/userList2")
@ApiOperation(value = "获取所有账号")
public ApiResult<List<SysUserVO>> getUserList(@RequestParam(value = "userType", required = false) Integer userType) {
    return ApiResult.data(userService.getUserList(userType));
}

// userType必传
@GetMapping("/userList3")
@ApiOperation(value = "获取所有账号")
// 或者参数前也可以只加@RequestParam,默认必传
public ApiResult<List<SysUserVO>> getUserList(@RequestParam(value = "userType", required = true) Integer userType) {
    return ApiResult.data(userService.getUserList(userType));
}

// userType必传(@RequestParam默认required=true)
@GetMapping("/userList4")
@ApiOperation(value = "获取所有账号")
public ApiResult<List<SysUserVO>> getUserList(@RequestParam Integer userType) {
    return ApiResult.data(userService.getUserList(userType));
}
总结内容:
(1)不加@RequestParam前端的参数名需要和后端控制器的变量名保持一致才能生效
(2)不加@RequestParam参数为非必传,加@RequestParam写法参数为必传。但@RequestParam可以通过@RequestParam(required = false)设置为非必传。
(3)@RequestParam可以通过@RequestParam(“userId”)或者@RequestParam(value = “userId”)指定传入的参数名。
(4)@RequestParam可以通过@RequestParam(defaultValue = “0”)指定参数默认值
(5)如果接口除了前端调用还有后端RPC调用,则不能省略@RequestParam,否则RPC会找不到参数报错
(6)不加@RequestParam注解,或@RequestParam注解required=false:url可带参数也可不带参数,输入 localhost:8080/userList1 以及 localhost:8080/userList1 ?userType=xxx 方法都能执行
加@RequestParam注解:url必须带有参数。也就是说你直接输入localhost:8080/userList3 会报错,不会执行方法。只能输入localhost:8080/userList3?userType=xxx 才能执行相应的方法
(3)举些栗子:@RequestParam与@PathVariable一起用,以及一些参数校验注解
    // id必传,且用@NotNull注解不能为null,keyWord非必传
    @GetMapping("/catalogue/{id}")
	public ApiResult<List<LibraryVO>> selectFilePage(@ApiParam(value = "目录ID(根目录:固定值'0')", required = true) @NotNull(message = "请选择目录") @PathVariable Long id,
													 @ApiParam(value = "搜索关键词") @RequestParam(required = false) String keyWord) {
		return ApiResult.data(null);
	}

    //两个参数都必传,用到了@NotNUll、@Length、@Pattern参数校验注解,在文末有讲解
	@PutMapping("/refuse")
	public ApiResult<Boolean> refuse(@NotNull(message = "订单ID不能为空") @RequestParam("id") Long id,
									 @NotNull(message = "退回原因不能为空")
									 @Length(max = 200, message = "退回原因最多允许输入200个字符")
									 @Pattern(regexp = "^[\\u4E00-\\u9FA5A-Za-z0-9\\s\\u00a0\\u3000`~!@#$%^&*()+=_|{}':;',\\\\\\[\\].<>/?~!@#¥%……&*()——+||{}【】‘;:”“’\"。,、?《》「」¥~-]*$", message = "退回原因不允许输入特殊字符")
									 @RequestParam("reason") String reason) {
		return ApiResult.data(null);
	}
【2】@PathVariable的使用
通过 @PathVariable 可以将 URL 中占位符参数绑定到控制器处理方法的入参中:URL 中的 {xxx} 占位符可以通过@PathVariable(“xxx“) 绑定到操作方法的入参中。
http://localhost:8080/wh/user/edit/9536258451259455114
// 源码
@Target({ElementType.PARAMETER})
@Retention(RetentionPolicy.RUNTIME)
@Documented
public @interface PathVariable {
    @AliasFor("name")
    String value() default "";

    @AliasFor("value")
    String name() default "";

    boolean required() default true;
}
(1)required默认必传
(2)举个栗子
    // @PathVariable可以用来映射URL中的占位符到目标方法的参数中
    @GetMapping("/detail/{id}")
    @ApiOperation(value = "系统用户查看详情", notes = "传入userId")
    public ApiResult<SysUserDetailVO> detail(@ApiParam(value = "主键", required = true) @PathVariable Long id) {
        return ApiResult.data(userService.detail(id));
    }

    // 两个参数都必传
    @GetMapping("/detail/{applyId}/{source}")
	public ApiResult<ContractReviewApplyVO> detail(@ApiParam(value = "审批流id", required = true) @PathVariable("applyId") Long applyId,
                                                   @ApiParam(value = "来源:1->业务审批;2->评审信息;3->续约信息", required = true) @PathVariable("source") Integer source){
		return ApiResult.data(contractReviewApplyService.detail(applyId,source));
	}

    // 两个参数都必传,且都不能为空
    @PostMapping("/customer/rename/{customerId}")
    public ApiResult customersRename(@Valid @RequestBody @NotEmpty(message = "参数不能为空") List<CustomerRenameDTO> renameList,
                                     @NotNull(message = "客户id不能为空") @PathVariable("customerId") Long customerId) {
        return ApiResult.status(customerService.customersRename(renameList,customerId));
    }
【3】@RequsetBody
@RequestBody主要用来接收前端传递给后端的json字符串中的数据的(请求体中的数据的);而最常用的使用请求体传参的无疑是POST请求了,所以使用@RequestBody接收数据时,一般都用POST方式进行提交。
    @PostMapping("/")
    @ApiOperationSupport(order = 3)
    @ApiOperation(value = "新增或编辑", notes = "")
    public ApiResult<Boolean> saveOrUpdate(@RequestBody List<WorkbenchOftenFeaturesRecordDTO> list) {
        return ApiResult.status(true);
    }

    // @RequestBody与@RequestParam联用
    @PostMapping("/save")
    @ApiOperationSupport(order = 1)
    @ApiOperation(value = "简历草稿记录表新增", notes = "传入ResumeImportVO")
    public ApiResult<String> save(@RequestParam(value = "id", required = false) Long id, @RequestBody ErpResume erpResume) {
        return ApiResult.data(null);
    }

    // @RequestBody与@PathVariable联用
    @PostMapping("/submit/{queryType}/{type}")
    public ApiResult<String> submit(@Valid @RequestBody ErpResume erpResume,
                                     @ApiParam(value = "简历类型:1-公共简历,2-个人简历", required = true) @PathVariable Integer queryType,
                                     @ApiParam(value = "按钮类型:1->上传简历;2->编辑;3->批量上传保存简历;4->保存简历后编辑简历;5->覆盖原简历", required = true) @PathVariable Integer type) {
        return ApiResult.data(null);
    }
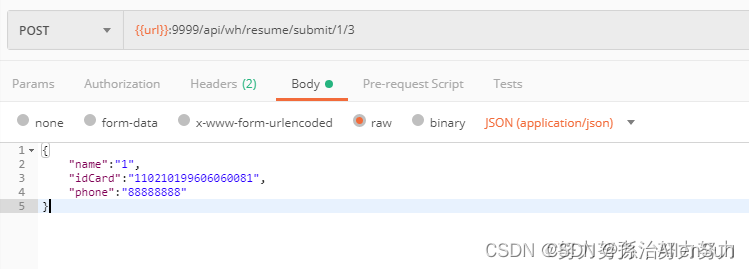
使用@RequestBody时注意
(1)不支持get请求,因为get请求没有HttpEntity
(2)必须要在请求头中申明content-Type(如application/json).springMvc通过HandlerAdapter配置的HttpMessageConverters解析httpEntity的数据,并绑定到相应的bean上
(3)在后端的同一个接收方法里,@RequestBody与@RequestParam()可以同时使用,@RequestBody最多只能有一个,而@RequestParam()可以有多个。
(4)建议最好不要与@RequestParam一起使用,是因为@RequestBody会将InputStream吃掉,造成后面的@RequsetParam无法匹配到参数而报400
【4】参数上什么注解都不加
【5】@RequestParam和@PathVariable的区别
它们都是用于request请求接受参数
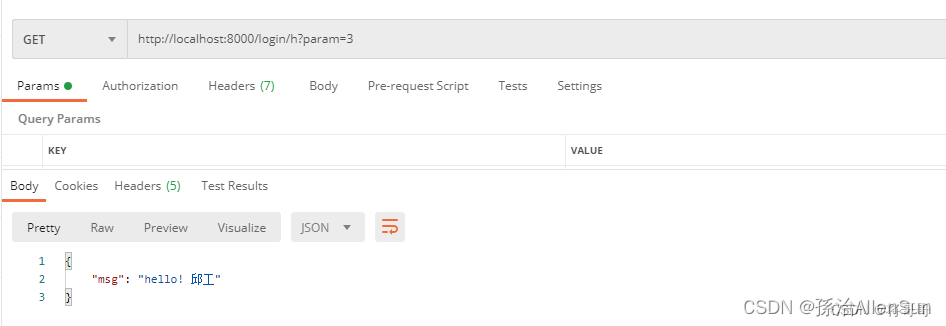
(1)@RequestParam是从请求体中获取参数值
get方式请求:http://localhost:8000/login/h?param = 3
 @ResponseBody
    @RequestMapping(value = "/h",method = RequestMethod.GET)
    public Map<String,Object> login( @RequestParam Integer param){
        Map map = new HashMap() ;
        switch (param){
            case 0:
                map.put("msg","你是邱工么");
                break;
            case 1:
                map.put("msg","你真的是邱工么");
                break;
            case 2:
                map.put("msg","是的  我是邱工");
                break;
            case 3:
                map.put("msg","hello! 邱工");
                break;
            case 4:
                map.put("msg","邱工哈哈");
                break;
            case 5:
                map.put("msg","邱工呵呵");
                break;

            default:{
                map.put("msg","邱工是个女的!");
                break;
            }
        }
        return map ;
    }
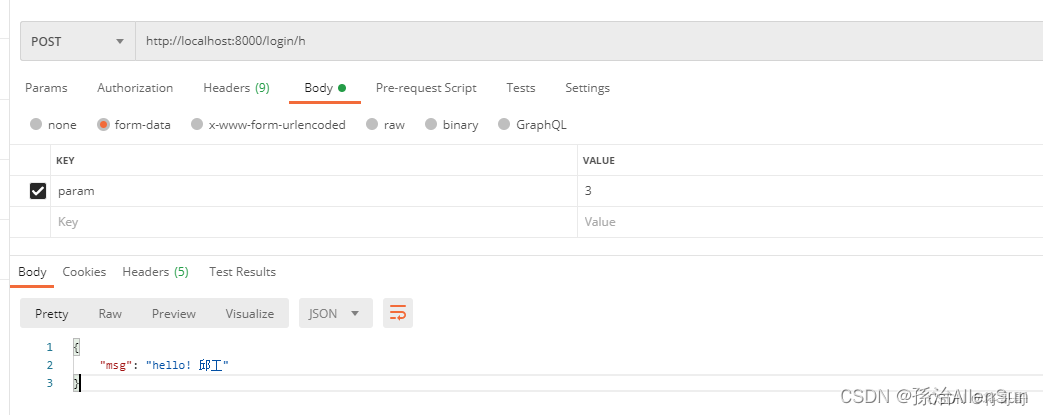
post方式请求:http://localhost:8000/login/h
 @ResponseBody
    @RequestMapping(value = "/h",method = RequestMethod.POST)
    public Map<String,Object> login( @RequestParam Integer param){
        Map map = new HashMap() ;
        switch (param){
            case 0:
                map.put("msg","你是邱工么");
                break;
            case 1:
                map.put("msg","你真的是邱工么");
                break;
            case 2:
                map.put("msg","是的  我是邱工");
                break;
            case 3:
                map.put("msg","hello! 邱工");
                break;
            case 4:
                map.put("msg","邱工哈哈");
                break;
            case 5:
                map.put("msg","邱工呵呵");
                break;

            default:{
                map.put("msg","邱工是个女的!");
                break;
            }
        }
        return map ;
    }
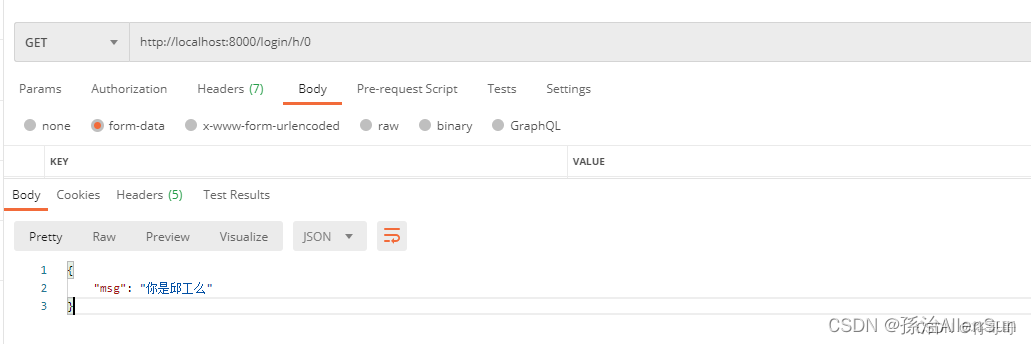
(2)@PathVariable是从url中获取请求值
get方式请求
@ResponseBody
@RequestMapping(value = "/h/{param}",method = RequestMethod.GET)
public Map<String,Object> login1( @PathVariable Integer param){
    Map map = new HashMap() ;
    switch (param){
        case 0:
            map.put("msg","你是邱工么");
            break;
        case 1:
            map.put("msg","你真的是邱工么");
            break;
        case 2:
            map.put("msg","是的  我是邱工");
            break;
        case 3:
            map.put("msg","hello! 邱工");
            break;
        case 4:
            map.put("msg","邱工哈哈");
            break;
        case 5:
            map.put("msg","邱工呵呵");
            break;

        default:{
            map.put("msg","邱工是个女的!");
            break;
        }
    }
    return map ;
}
请求地址格式:http://localhost:8000/login/h/{param}
http://localhost:8000/login/h/0
【6】@ResponseBody和@RequestBody两者的作用以及如何使用的?
(1)@ResponseBody的作用是将java数据格式转换为JSON数据格式 (后台 -> 前台)
如果控制类使用的是@Controller那么函数上一定需要加@ResponseBody,不然会报错
@ResponseBody
@PostMapping("/pwd2")
public Map loginByPwd1(@RequestBody PostUserBean postUserBean)
(2)@RequestBody 将前台JSON 对象数据转换为后台可处理数据 (前台 -> 后台)
1.如果参数时放在请求体中,application/json传入后台的话,那么后台要用@RequestBody才能接收到;
2.如果不是放在请求体中的话,那么后台接收前台传过来的参数时,要用@RequestParam来接收,或者形参前 什么也不写也能接收。
3.如果参数前写了@RequestParam(xxx),那么前端必须有对应的xxx名字才行(不管其是否有值,当然可以通过设置该注解的required属性来调节是否必须传),如果没有xxx名的话,那么请求会出错,报400。
@ResponseBody
@PostMapping("/pwd2")
public Map loginByPwd1(@RequestBody PostUserBean postUserBean){
    Map map = new HashMap() ;
    if (postUserBean == null || postUserBean.getName() == null ||!postUserBean.getName().equals("邱工")){
        map.put("msg","请传入{“Name:邱工”}");
    } else {
        map.put("classInfo",classInfoBean.userInfo());
    }
    return map;
}
【7】@PathParam和@RequestParam的区别
@PathParam和@RequestParam具有相同的使用,都是重request的请求中获取值,@RequestParam属于Spring,@PathParam是在javax.websocket.server这个包下的类。
【8】@RequestParam是否必传设置
加与不加的区别
@RequestMapping("/list1")
public String test1(int userId) {
  return "list";
}
@RequestMapping("/list2")
public String test2(@RequestParam int userId) {
  return "list";
}
(1)不加@RequestParam前端的参数名需要和后端控制器的变量名保持一致才能生效
(2)不加@RequestParam参数为非必传,加@RequestParam写法参数为必传。但@RequestParam可以通过@RequestParam(required = false)设置为非必传。
(3)@RequestParam可以通过@RequestParam(“userId”)或者@RequestParam(value = “userId”)指定传入的参数名。(最主要的作用)
(4)@RequestParam可以通过@RequestParam(defaultValue = “0”)指定参数默认值
(5)如果接口除了前端调用还有后端RPC调用,则不能省略@RequestParam,否则RPC会找不到参数报错
(6)Get方式请求,参数放在url中时:
1-不加@RequestParam注解:url可带参数也可不带参数,输入 localhost:8080/list1 以及 localhost:8080/list1?userId=xxx 方法都能执行
2-加@RequestParam注解:url必须带有参数。也就是说你直接输入localhost:8080/list2 会报错,不会执行方法。只能输入localhost:8080/list2?userId=xxx 才能执行相应的方法
【五】常用的传参案例
(1)postman传List集合,用@RequestBody接收
(1)后端接口
@ApiOperation("更新角色权限")
@PostMapping("/permission/update")
public Results updateRolePermission(@RequestParam int id,
                                    @RequestBody List<String> permissions){
    return rolePermissionService.updateRolePermission(id, permissions);
}
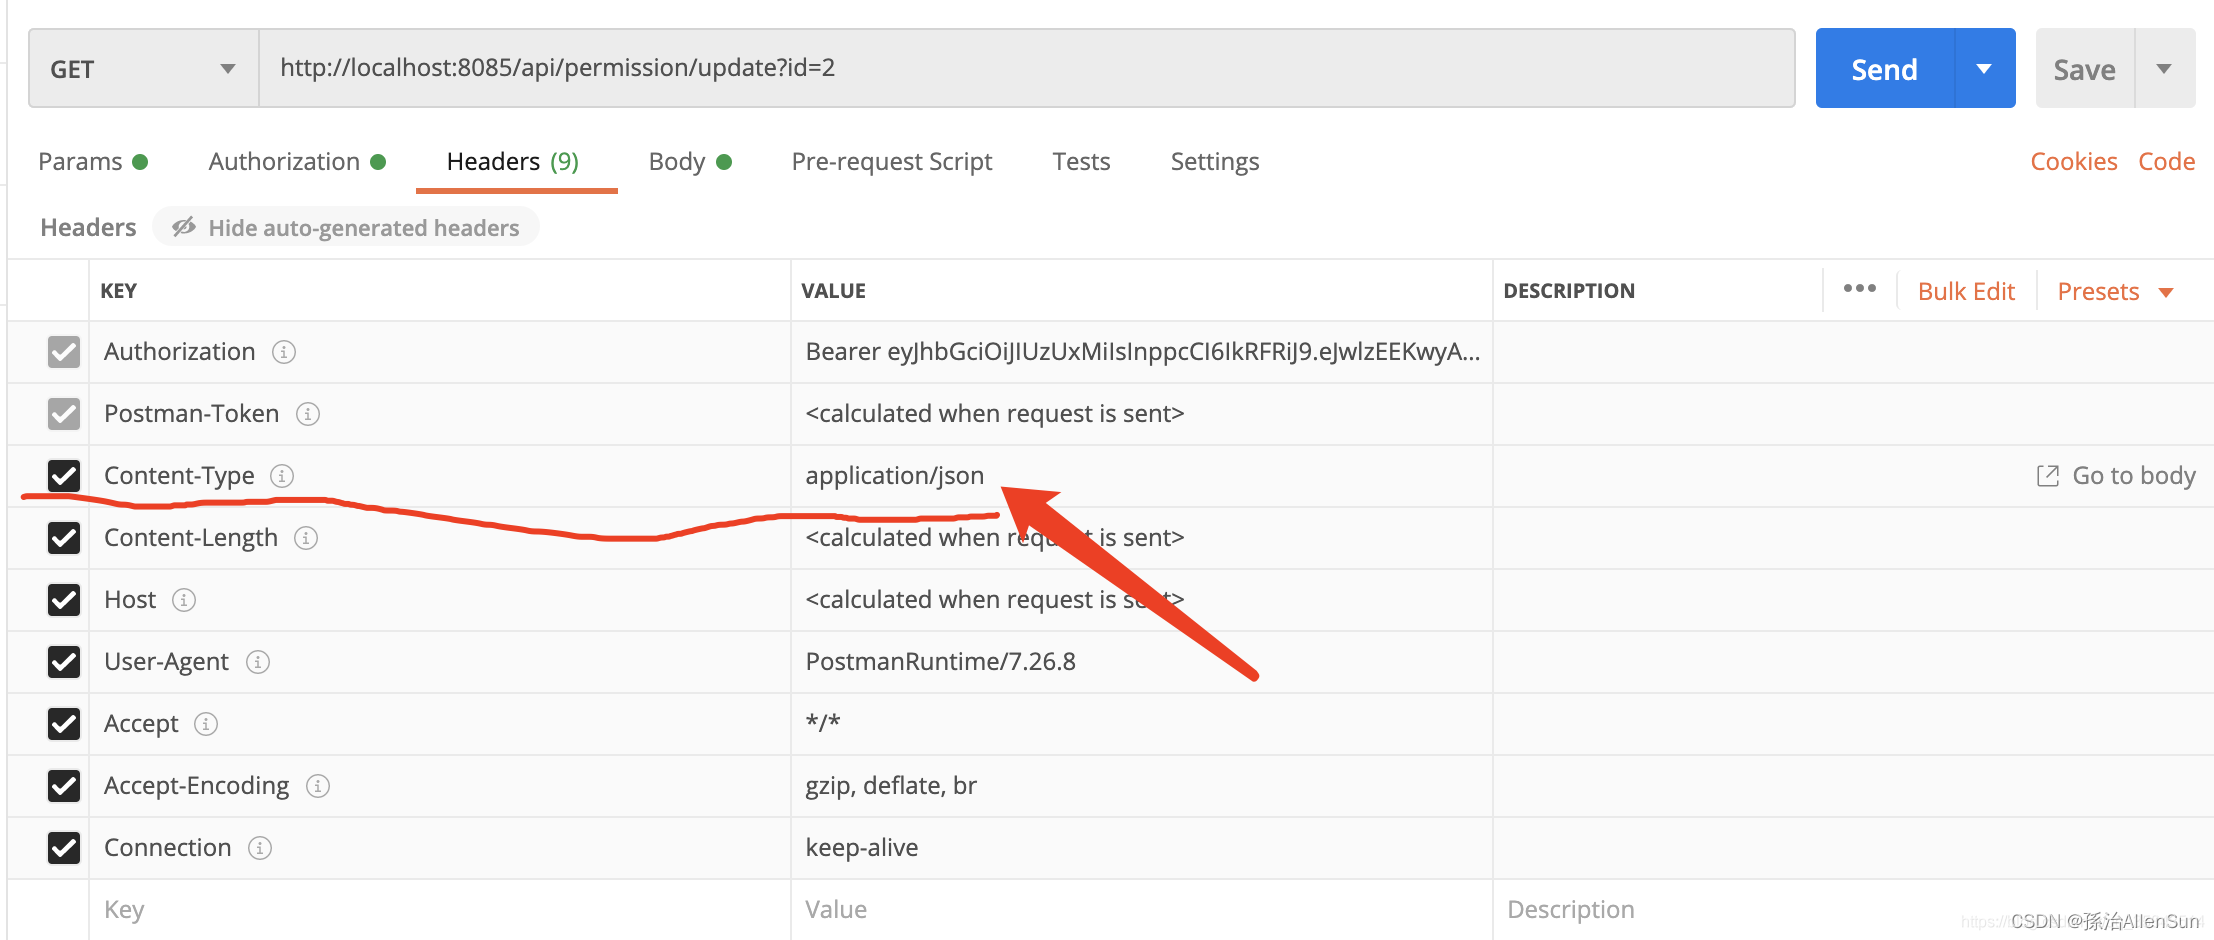
(2)postman测试
Header中添加 “ Content-Type: application/json ”表示解析为JSON
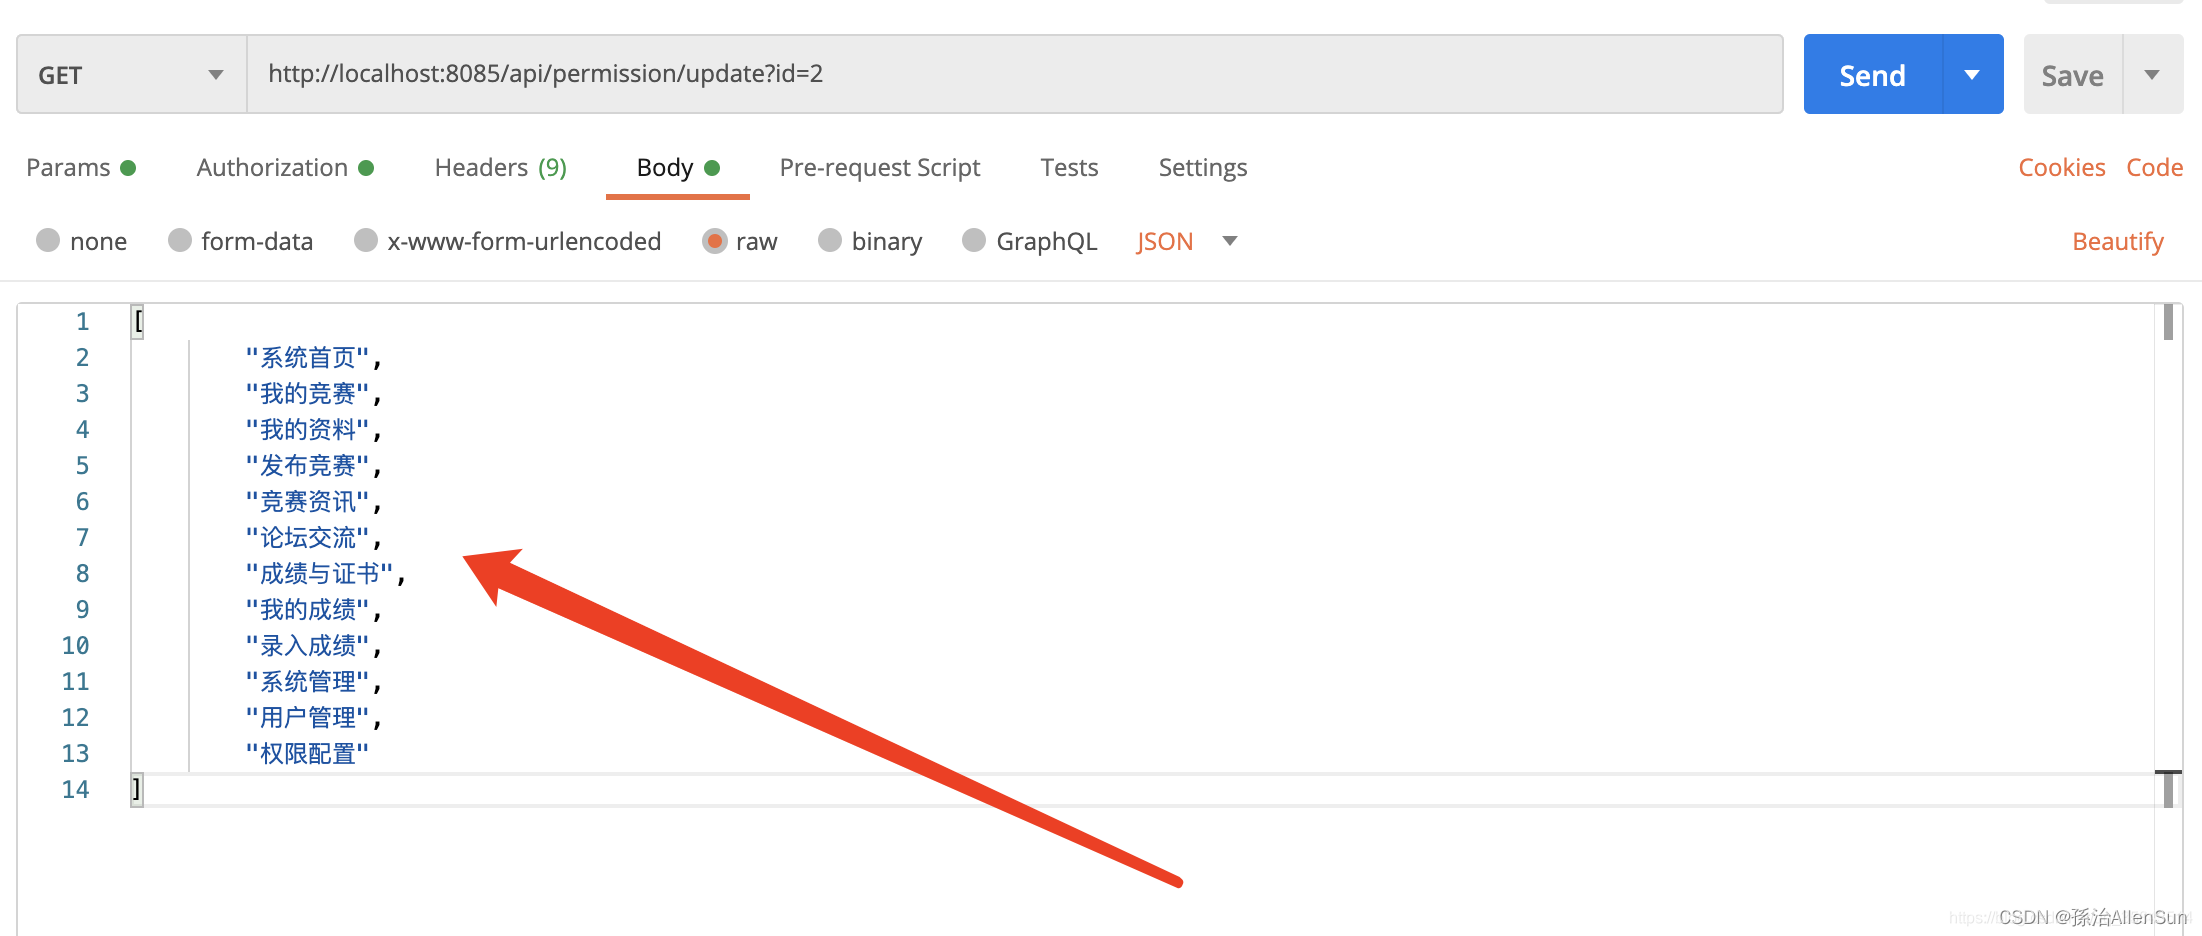
(3)补充说明
这里传递的是String集合,其他对象集合,使用{}包住对象,如:
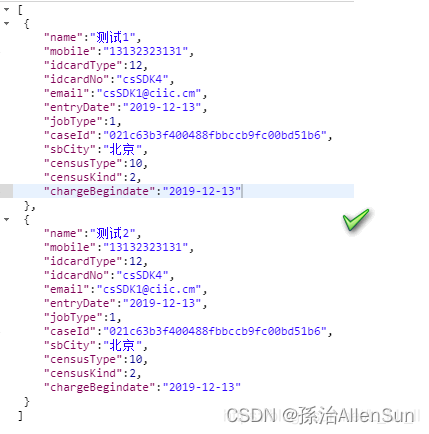
public 返回值 方法名(@RequestBody List<EmpModel> list){
	...
}
(4)序列化实体类
private static final long serialVersionUID = 1L;
这样后台才能接受数据,但是实际上前端写好的情况下一般不会加这个语句,只有在postman的时候才会需要使用,原因在于在提交数据的时候前端一般都会处理好数据交付给后台
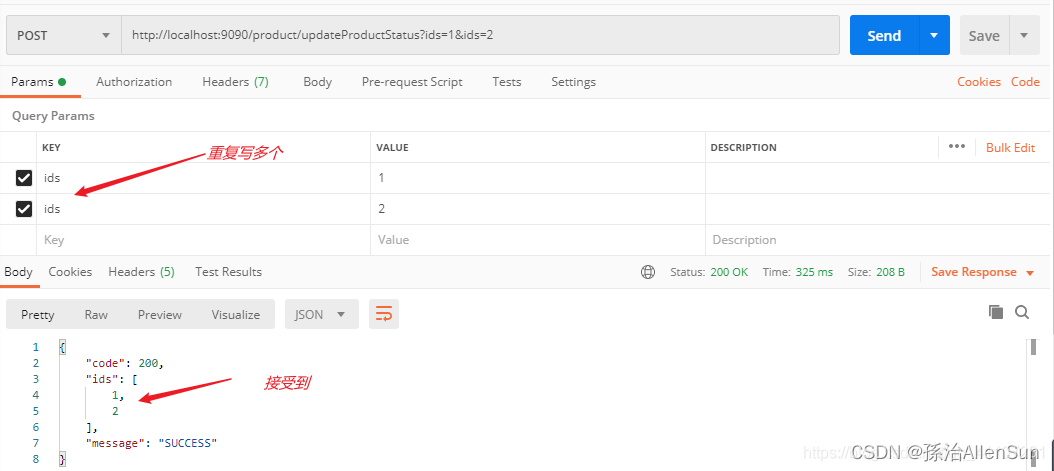
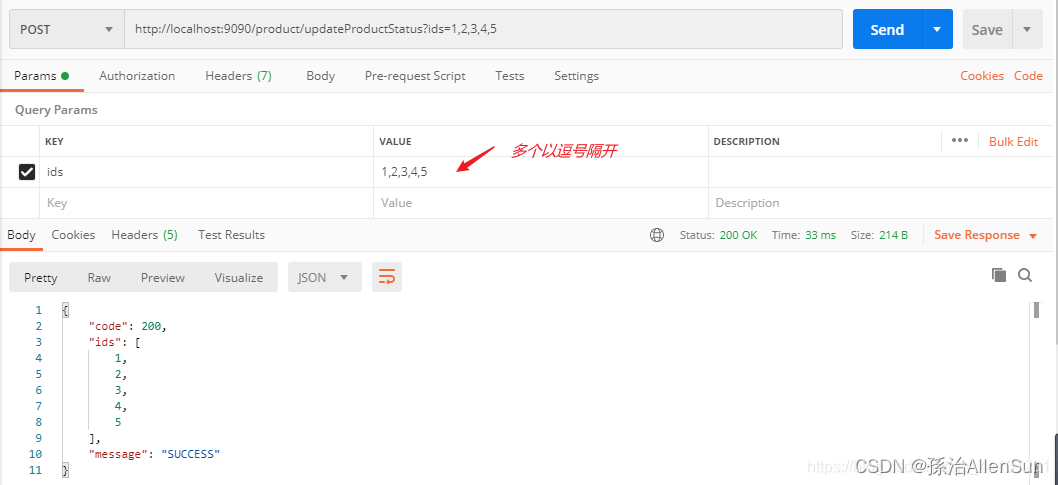
(2)postman传List集合,用@RequestParam接收
 @PostMapping("/updateProductStatus")
 public JSONObject updateProductStatus(@RequestParam(value = "ids",required = false) List<Integer> ids){
     JSONObject json = new JSONObject();
     json.put("code",200);
     json.put("message","SUCCESS");
     json.put("ids",ids);
     return json;
 }
第一种写法:
第二种写法:
(3)@RequestParam接受一个List类型和Integer类型参数
public JSONObject updateProductStatus(@RequestParam(value = "ids",required = false) List<Integer> ids,
                                          @RequestParam(value = "status",required = false) Integer status)
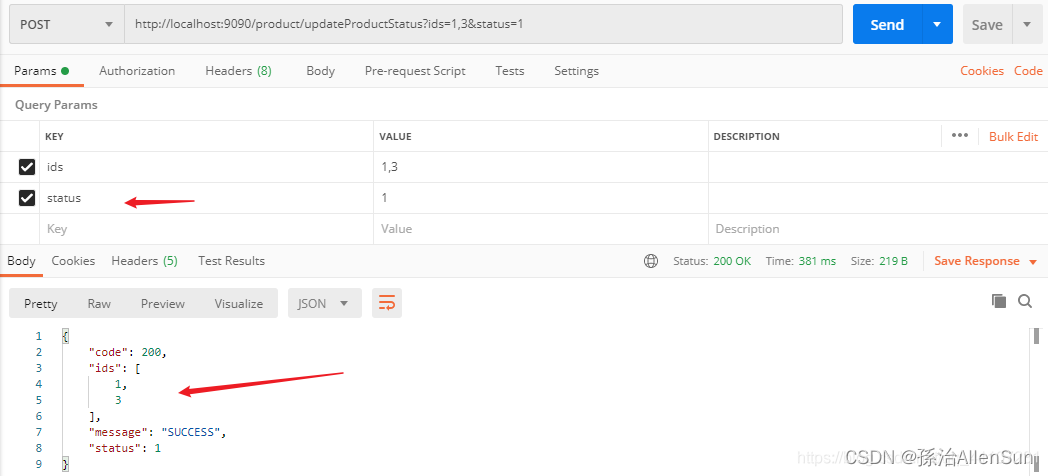
(4)@RequestBody接受前端传来的json数据
public JSONObject updateProductStatus1(@RequestBody List<Integer> ids)
选择Body -》raw-》JSON
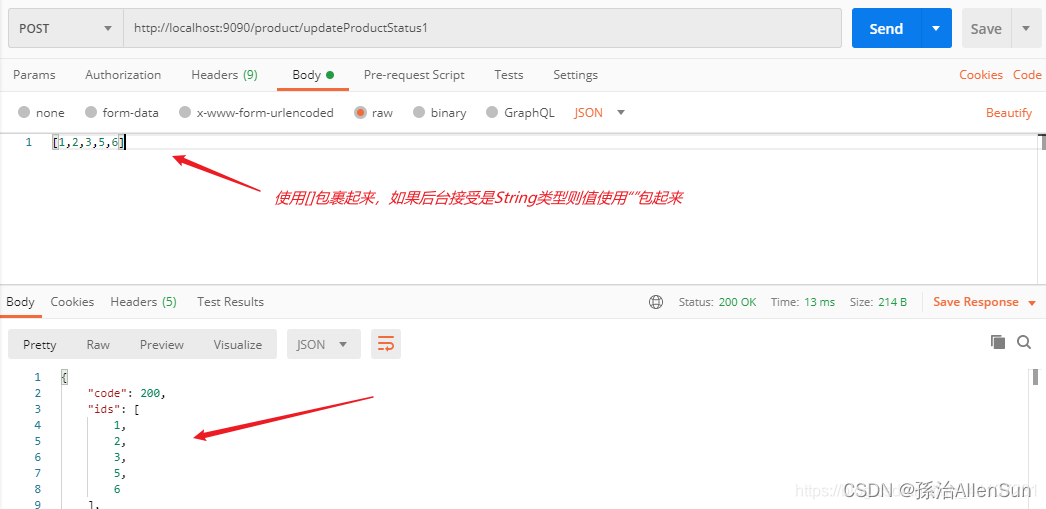
(5)@RequestBody接受一个List类型和Integer类型参数
@PostMapping("/updateProductStatus2")
public JSONObject updateProductStatus2(@RequestBody HashMap<String,Object> map){
    JSONObject json = new JSONObject();
    // 接收List
    List<Integer> ids = (List<Integer>) map.get("ids");
    // 接收另外一个参数
    Integer status = (Integer) map.get("status");
    // 返回
    json.put("code",200);
    json.put("message","SUCCESS");
    json.put("ids",ids);
    json.put("status",status);
    return json;
}
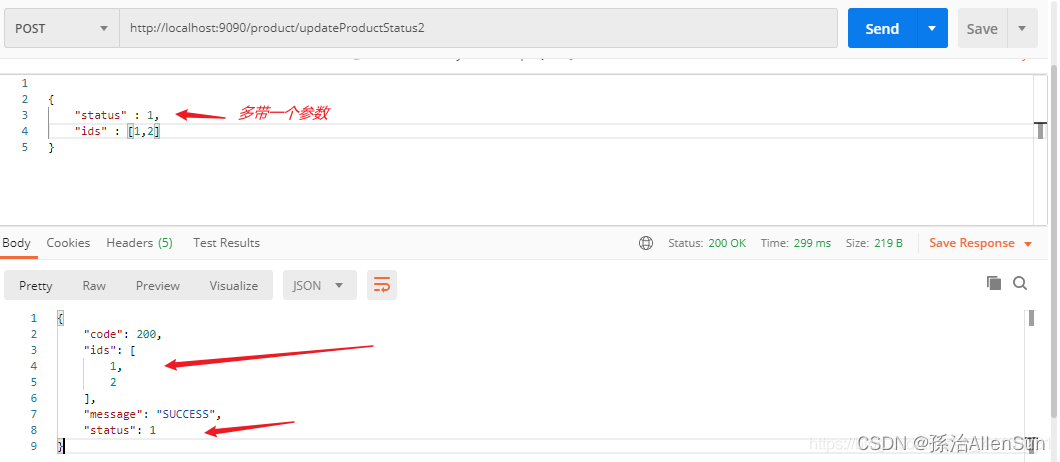
(6)@RequestParam接受一个Integer类型数组参数
@PostMapping("/deleteUserArrayByIds")
public JSONObject deleteUserArrayByIds(@RequestParam(value = "ids",required = false) Integer[] ids){
    for (Integer id : ids){
        System.out.println("数组=="+id);
    }
    JSONObject jsonObject = baseUserService.deleteUserArrayByIds(ids);
    return jsonObject;
}
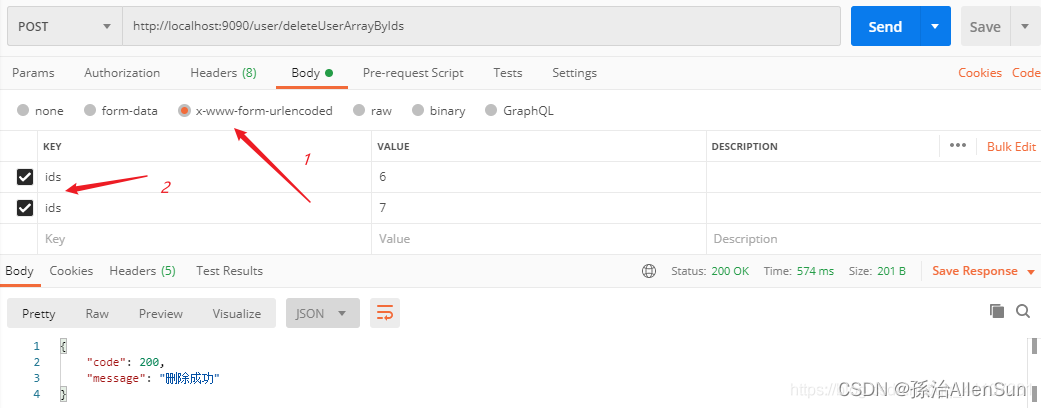
【六】Restful风格案例
【1】基本介绍
在web开发中,提交请求和接收请求,method常用的是 get 和 post,用了Restful风格后,method还可以是 put 和 delete 等等其他值。
既然 method 足够丰富,那么 url 就没有必要那么复杂了,可以考虑使用同一个 url,但是约定使用不同的 method 接收就实施不同的业务,最常见的就是CRUD操作。
RESTful API 可以你看到 url + http method 就知道这个 url 是干什么的,让你看到了 http 状态码(status code)就知道请求结果如何。
【2】Restful风格和普通风格的区别
CRUD如下表所示,URL就都使用一样的 “/categories”,区别只是在于method不同,服务器根据method的不同来判断浏览器期望做的业务行为

(1)增的区别
(1.1)add的普通风格
发送请求,action传出的 url 路径是 /save,用的 method 是 post

接收请求,根据路径 save 匹配控制器

(1.2)add的Restful风格
发送请求,action传出的 url 路径是 /accounts,用的 method 是 post

接收请求,根据 accounts 匹配控制器,指明使用的 method 为 POST 进行处理,这里 POST 表示“add增加”

(2)删的区别
(2.1)delete的普通风格
发送请求,action 传出的 url 路径是 /deleteAccount
 接收请求,根据路径 deleteAccount 匹配控制器

(2.2)delete的Restful风格
发送请求,href 传出的 url 路径还是 /accounts

接收请求,根据 accounts 匹配控制器,指明使用的 method 为 DELETE 进行处理,这里 DELETE 表示“delete删除”

(3)改的区别
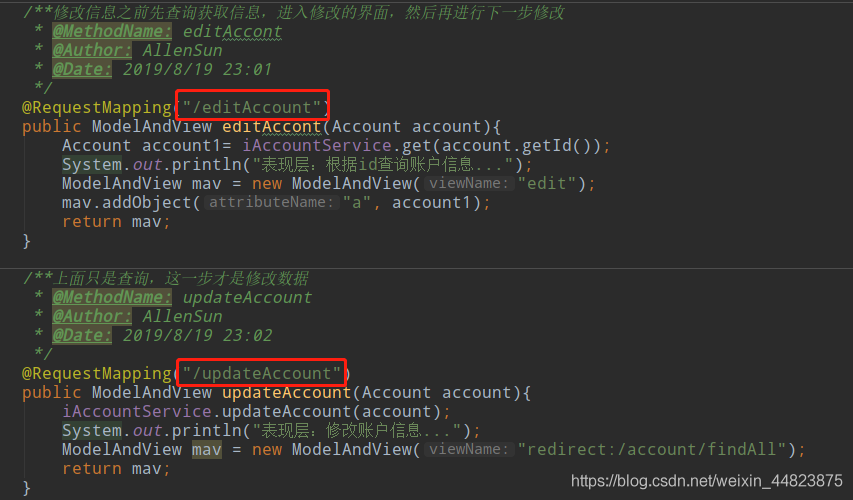
(3.1)edit的普通风格
发送请求,href 传出的 url 路径是 /editAccount

接收请求,根据路径 editAccount 匹配控制器
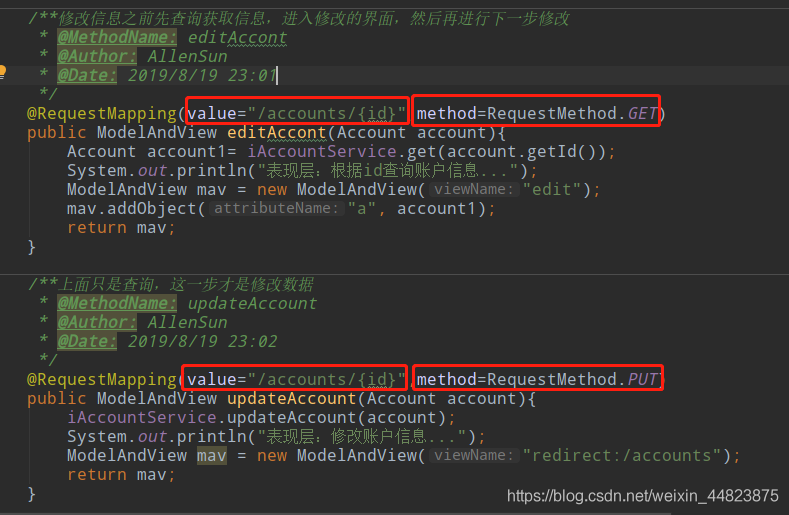
(3.2)edit的Restful风格
发送请求,action 传出的 url 路径是 /accounts

接收请求,根据 accounts 匹配控制器,指明使用的 method 为 GET 和 PUT 进行处理,这里 GET 表示检索,PUT 表示“update更新”
(4)查的区别
(4.1)select的普通风格
发送请求,action传出的 url 路径是 /findAll
接收请求,根据路径 findAll 匹配控制器

(4.2)select的Restful风格
发送请求,action传出的 url 路径是 /accounts
接收请求,根据 accounts 匹配控制器,指明使用的 method 为 GET 进行处理,这里 GET 表示“select查询”

【3】REST 接口规范的总结
(1)动作
- GET :请求从服务器获取特定资源。举个例子:GET /classes(获取所有班级)
- POST :在服务器上创建一个新的资源。举个例子:POST /classes(创建班级)
- PUT :更新服务器上的资源(客户端提供更新后的整个资源)。举个例子:PUT /classes/12(更新编号为 12 的班级)
- DELETE :从服务器删除特定的资源。举个例子:DELETE /classes/12(删除编号为 12 的班级)
(2)路径(接口命名)
GET /classes:列出所有班级
POST /classes:新建一个班级
GET /classes/classId:获取某个指定班级的信息
PUT /classes/classId:更新某个指定班级的信息(一般倾向整体更新)
PATCH /classes/classId:更新某个指定班级的信息(一般倾向部分更新)
DELETE /classes/classId:删除某个班级
GET /classes/classId/teachers:列出某个指定班级的所有老师的信息
GET /classes/classId/students:列出某个指定班级的所有学生的信息
DELETE classes/classId/teachers/ID:删除某个指定班级下的指定的老师的信息
(3)过滤信息(Filtering)
如果我们在查询的时候需要添加特定条件的话,建议使用 url 参数的形式。比如我们要查询 state 状态为 active 并且 name 为 guidegege 的班级:
GET /classes?state=active&name=guidegege
比如我们要实现分页查询:
GET /classes?page=1&size=10 //指定第1页,每页10个数据
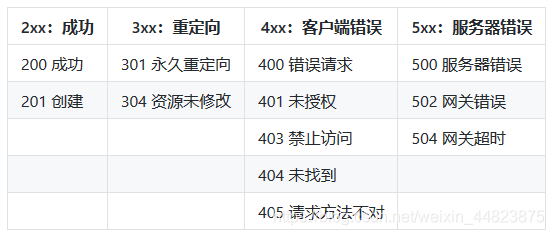
(4)状态码(Status Codes)
【七】结合前端的传参案例
【1】准备表单和pojo实体类
(1)前端代码index.jsp
<html>
    <head>
        <title>请求参数绑定的讲解</title>
        <script src="js"></script>
    </head>
    <body>
        <h3>请求参数绑定的讲解</h3>
        <%--参数username和password会和Controller里方法中的参数比对--%>
        <%--也可以把这一部分调出去,写一个JavaBean,先把这段注释掉--%>
        <%--<a href="param/testParam?username=hehe & password=123">请求参数绑定</a>--%>

        <form id="form" action="param/commonParams" method="post">
            <%--Account类name属性要跟Controller里的参数一样--%>
            姓名:<input type="text" name="username"><br>
            密码:<input type="text" name="password"><br>
            金额:<input type="text" name="money"><br>
            <%--把user类的属性也封装到Account里去--%>
            用户姓名:<input type="text" name="user.uname"><br>
            用户年龄:<input type="text" name="user.age"><br>
            <input type="submit" value="提交"><br>
        </form>
    </body>
</html>
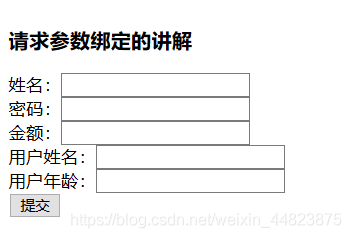
效果如图:
(2)pojo实体类(省略setget方法和toString)
(1)User类
public class User implements Serializable {
    private String uname;
    private String age;
    ...
}
(2)Account类(包含User对象)
public class Account implements Serializable {
    private String username;
    private String password;
    private Double money;

//    引入一个实体类(获取getter方法,和toString)
    private User user;
    ...
}
【2】五种传参方式(开始Controller)
(1)接收普通请求参数(用参数变量接收)
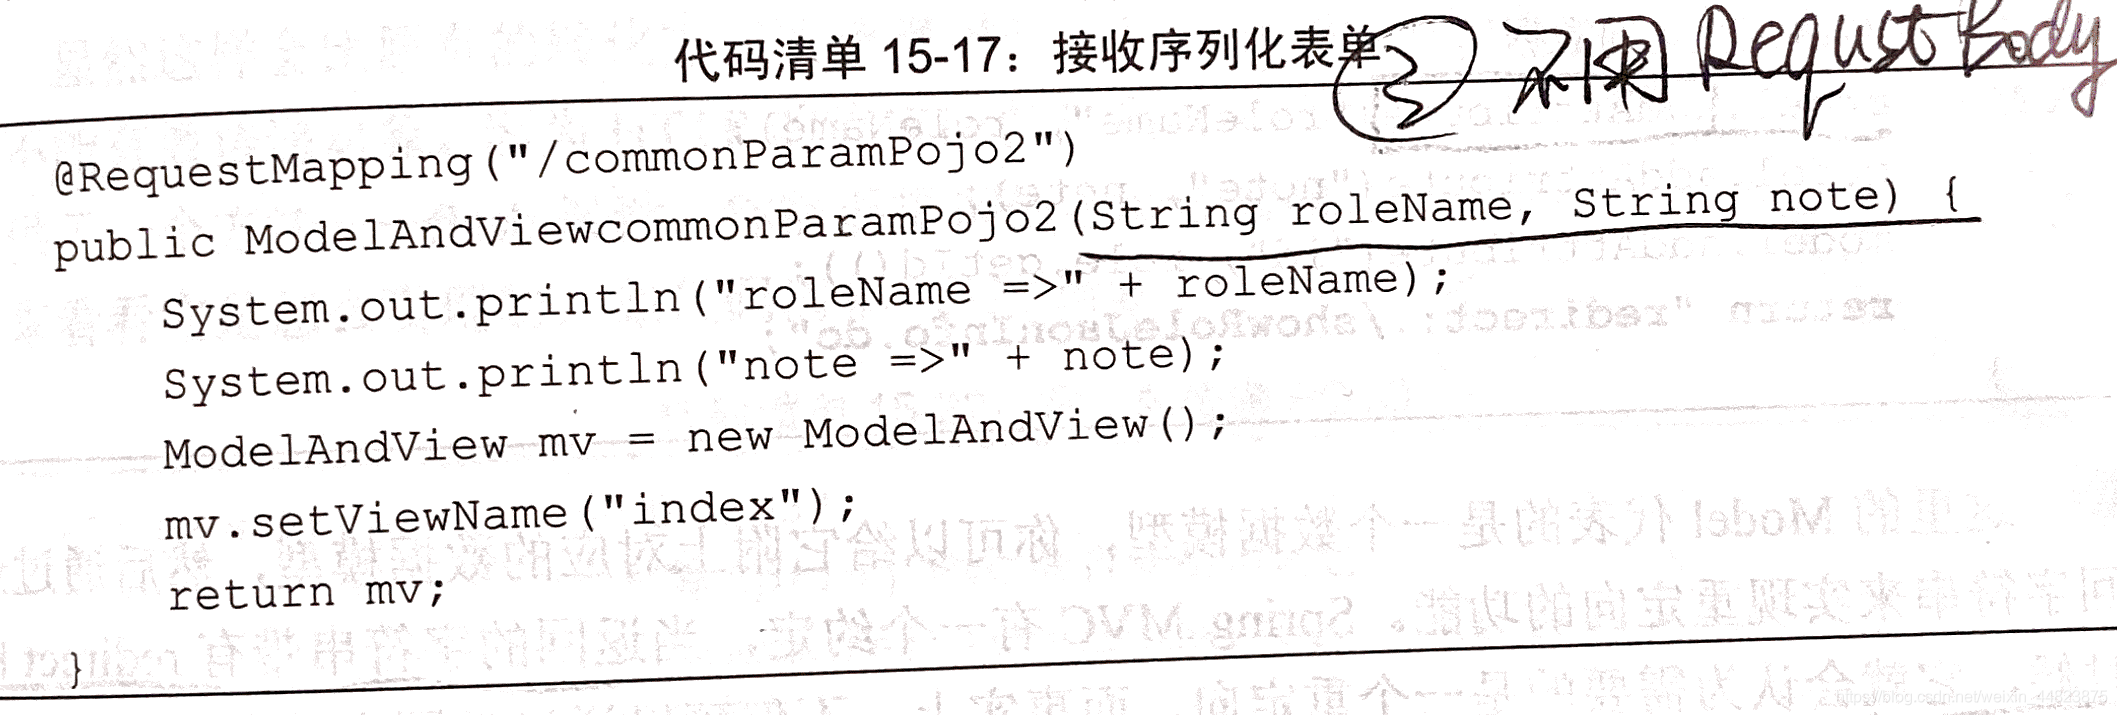
如果传递过来的参数名称和HTTP的保存一致,那么不用任何注解也可以获取参数。上面表单提交传递三个HTTP参数,controller中用String类型和Double类型对参数直接进行获取。
如果Controller方法中的参数名称和HTTP请求参数的名称不一致,就无法获取到,允许参数为空
1:Controller编写
@Controller
@RequestMapping("/param")
public class ParamTestController {
    @RequestMapping("/commonParams")
    public ModelAndView commonParams(String username,String password,Double money){
        System.out.println(username);
        System.out.println(password);
        System.out.println(money);
        ModelAndView mv=new ModelAndView();
        mv.setViewName("yes");
        return mv;
    }
}
2:前台输入数据
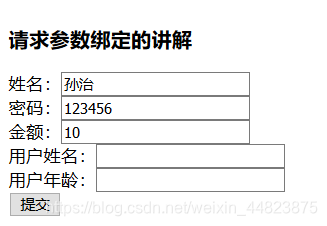
3:运行效果
如图,Controller确实获取到了前台传进来的参数,并且在控制台进行了输出

(2)接收普通请求参数(用pojo实体类接收)
(1)Controller编写
@Controller
@RequestMapping("/param")
public class ParamTestController {
    @RequestMapping("/commonParams")
    public ModelAndView commonParams(Account account){
        System.out.println(account.getUsername());
        System.out.println(account.getPassword());
        System.out.println(account.getMoney());
        ModelAndView mv=new ModelAndView();
        mv.setViewName("yes");
        return mv;
    }
}
(2)前台输入
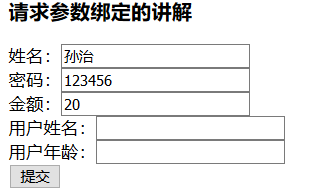
(3)运行效果(pojo实体类成功获取到参数,并且自动赋值给属性字段)
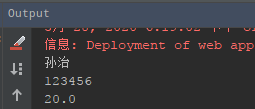
(3)使用@RequestParam注解获取参数
如上所述,要求参数名称和HTTP的请求参数必须一致。如果不想保持一致就可以使用@RequestParam注解
(1)前端的参数修改成name,与参数username不再一致

(2)Controller编写(用注解获取请求参数,然后再赋值给参数)
默认情况下参数不能为空,当加上required = false,就可以允许请求参数为空
	@RequestMapping("/commonParams")
    public ModelAndView commonParams(@RequestParam(value = "name",required = false) String username){
        System.out.println(username);
        ModelAndView mv=new ModelAndView();
        mv.setViewName("yes");
        return mv;
    }
(3)运行效果(获取成功)

(4)使用URL传递参数(RESTful风格)
适用于一些业务比较简单的应用
(1)Controller编写
    @RequestMapping("/commonParams/{id}")
    public ModelAndView commonParams(@PathVariable("id") Long id){
        System.out.println(id);
        ModelAndView mv=new ModelAndView();
        mv.setViewName("yes");
        return mv;
    }
(2)修改URL访问路径

(5)传递JSON参数(参数较多转成JSON集,@RequestAttribute或者@RequestBody)
(1)用jQuery传递数据
        <script>
            $("#btn").click(function () {

                var data={
                    username:"孙治",
                    password:"123456",
                    money:"30",
                    user:{
                        uname:"Allen",
                        age:"18"
                    }
                }

                $.post({
                    url:"param/commonParams",
                    contentType:"application/json",
                    data:JSON.stringify(data),
                    success:function (result) {

                    }
                })
            })
        </script>
(2)controller编写
@RequestAttribute或者@RequestBody
    @RequestMapping("/commonParams")
    public ModelAndView commonParams(@RequestAttribute Account account){
        System.out.println(account);
        ModelAndView mv=new ModelAndView();
        mv.addObject(account);
        mv.setViewName(String.valueOf(new MappingJackson2JsonView()));
        return mv;
    }
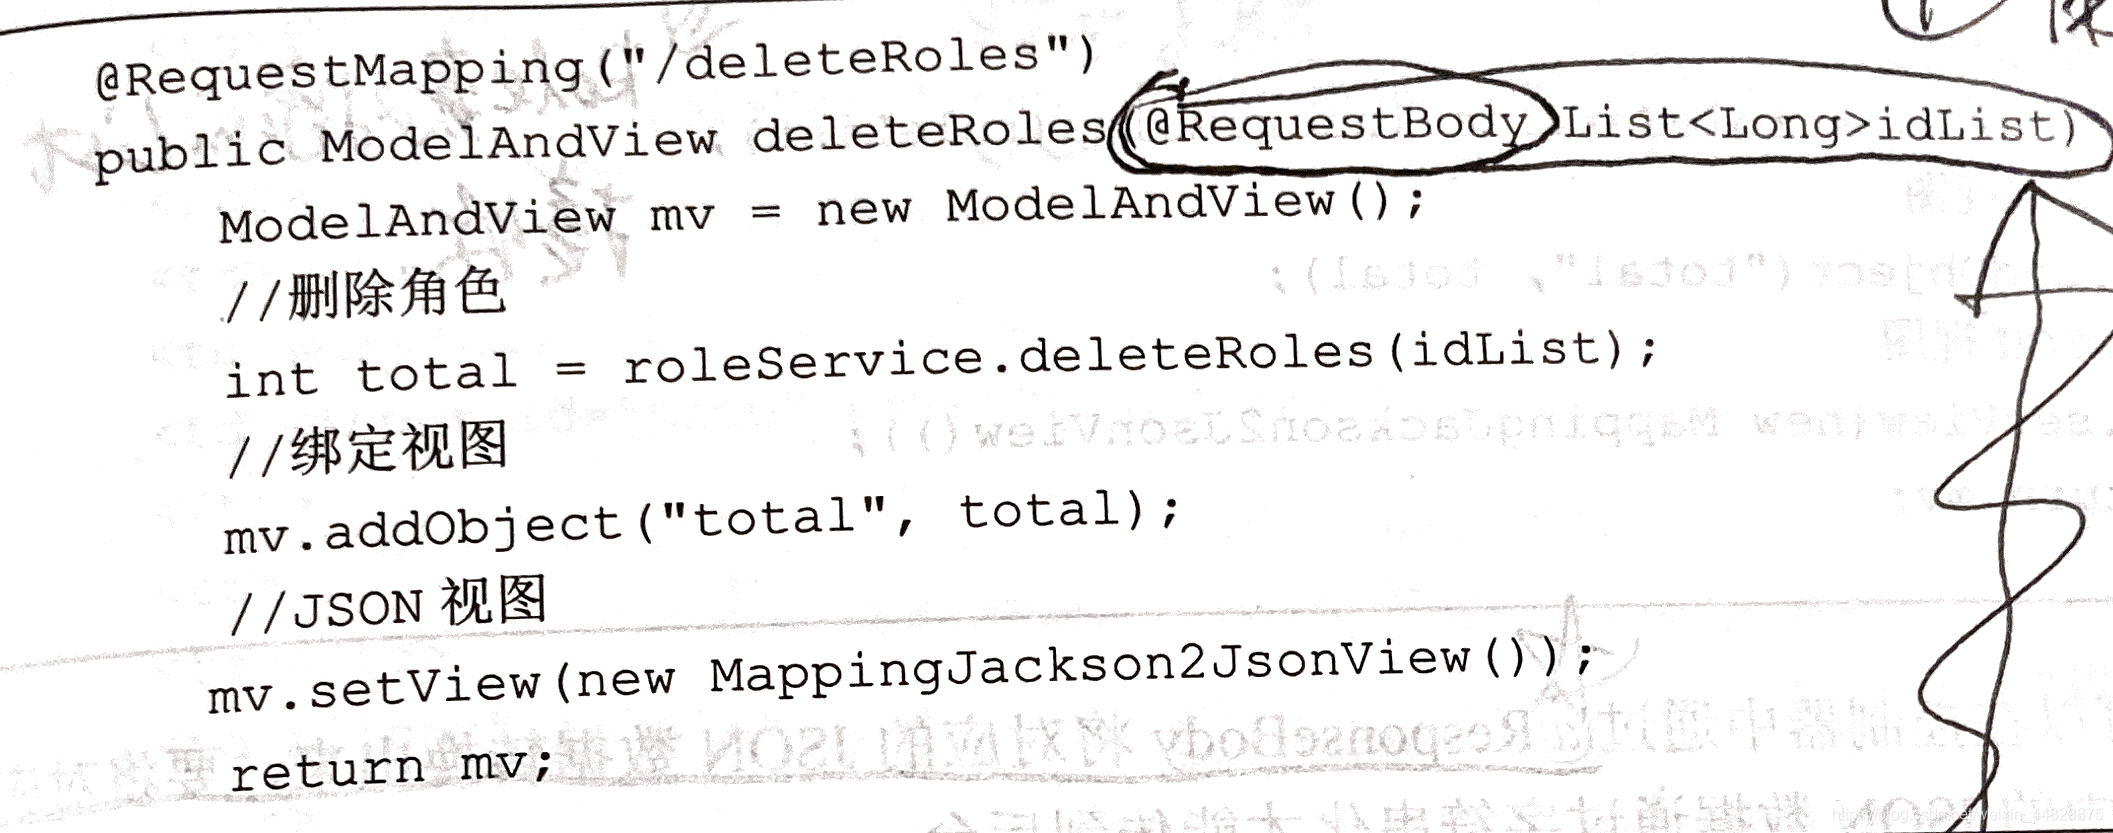
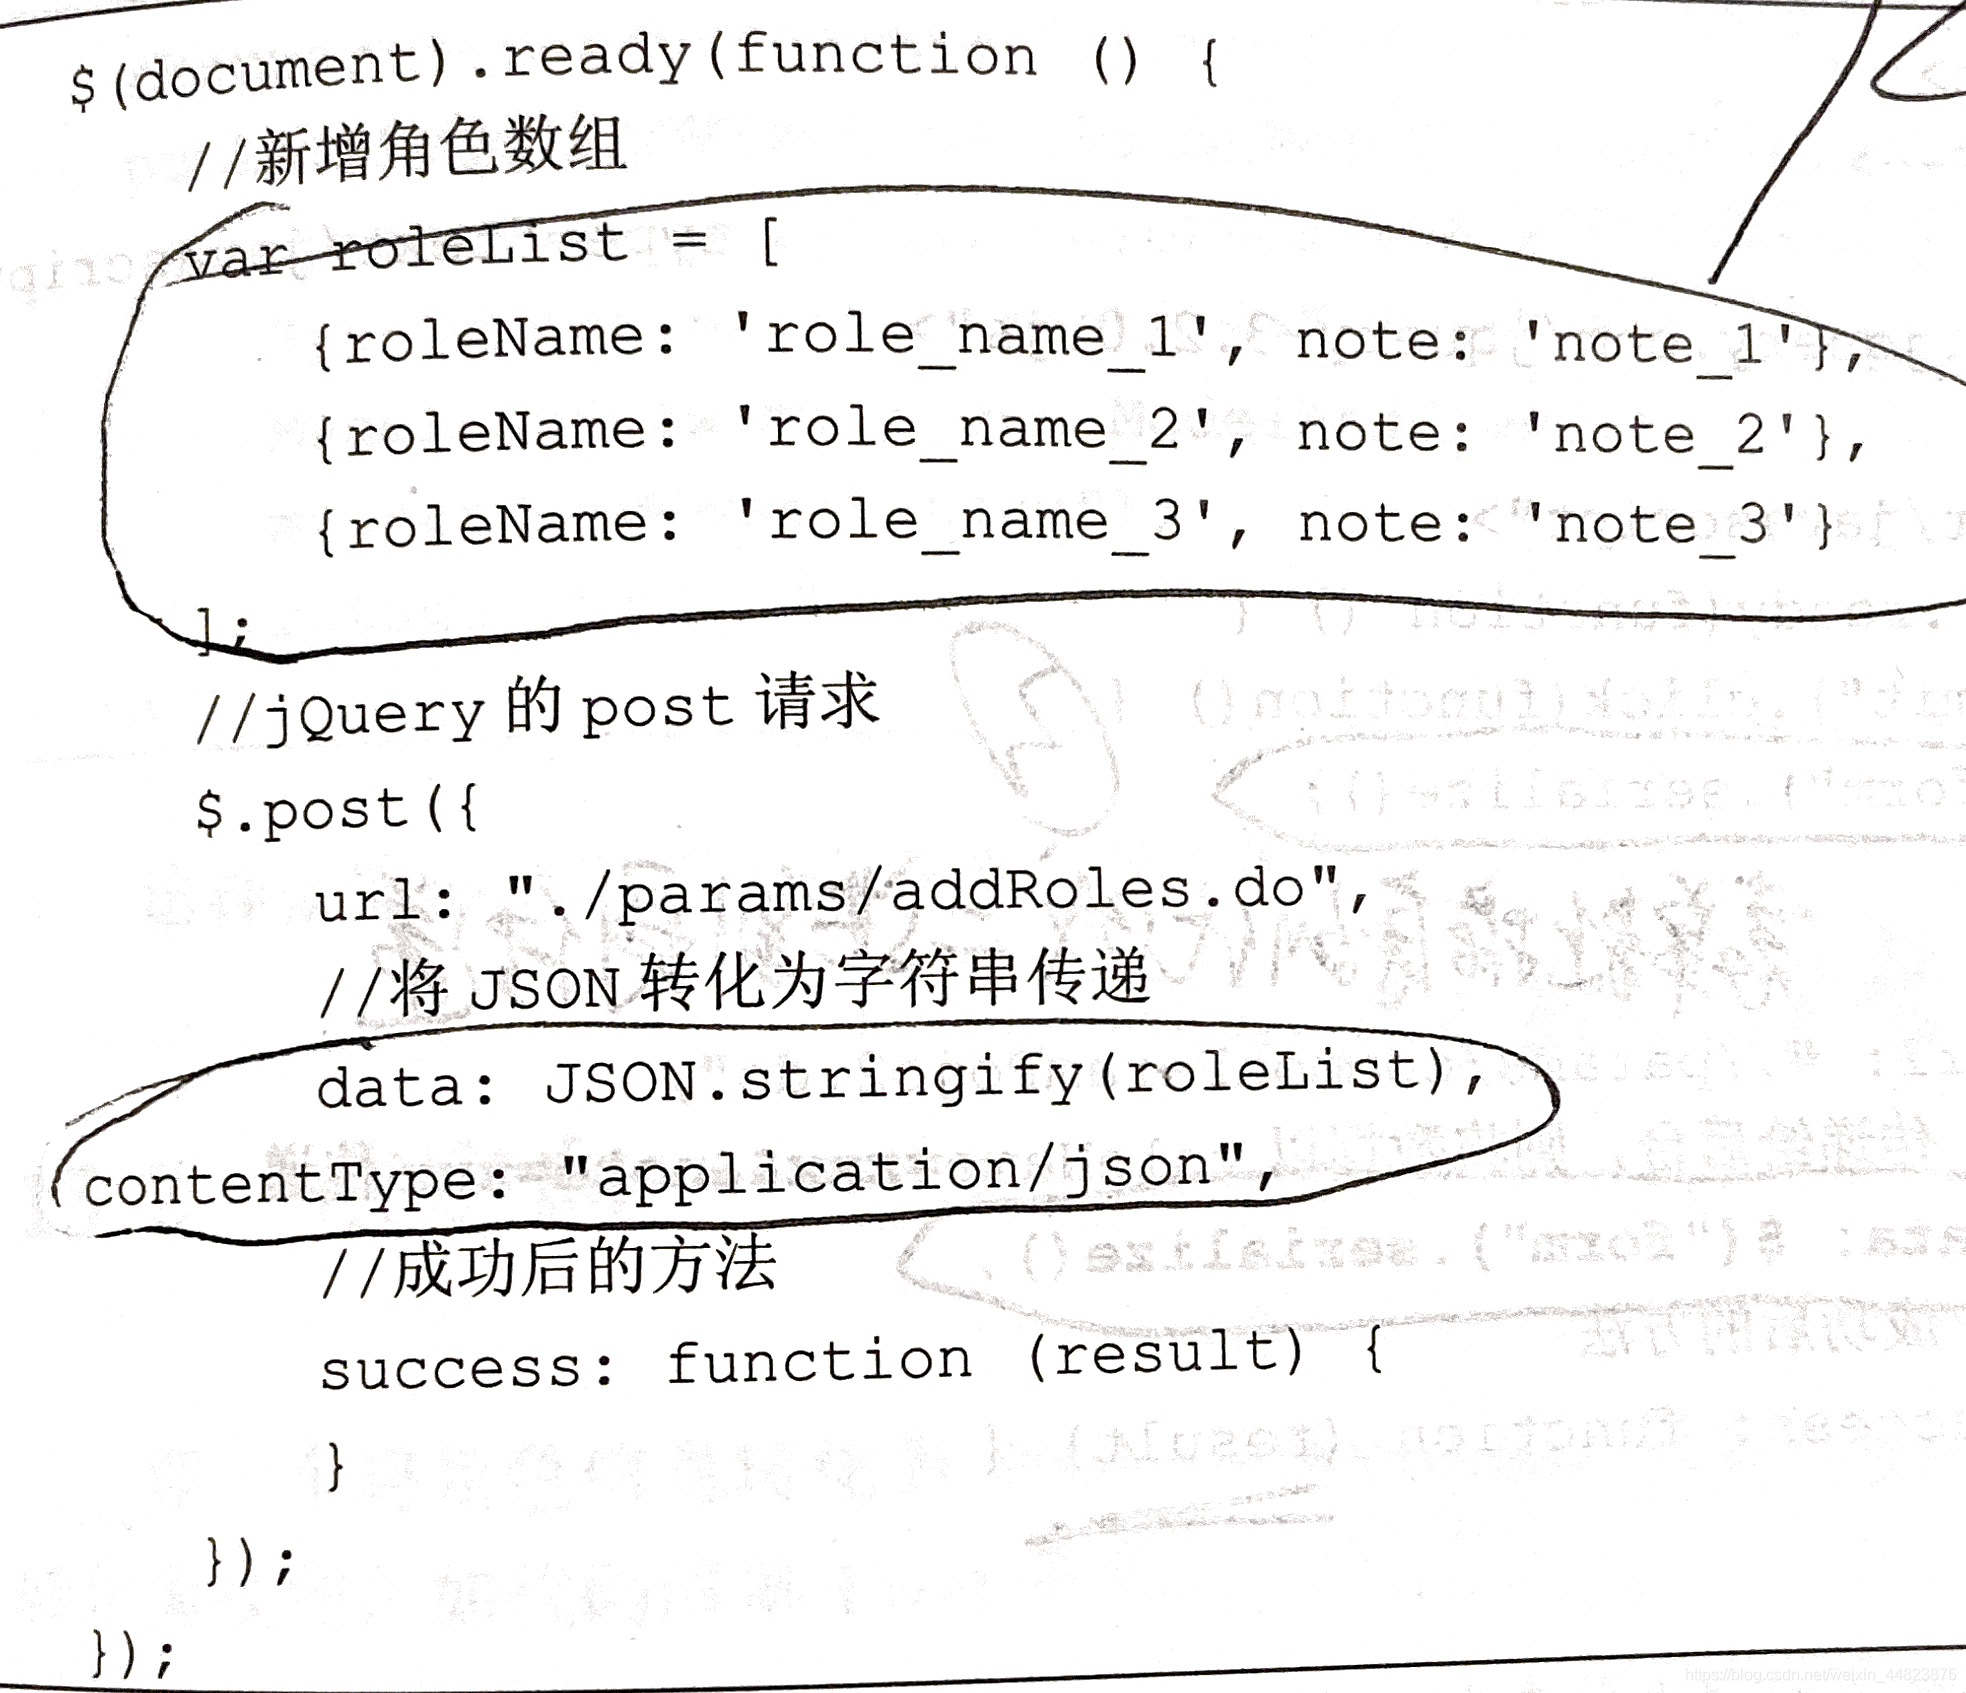
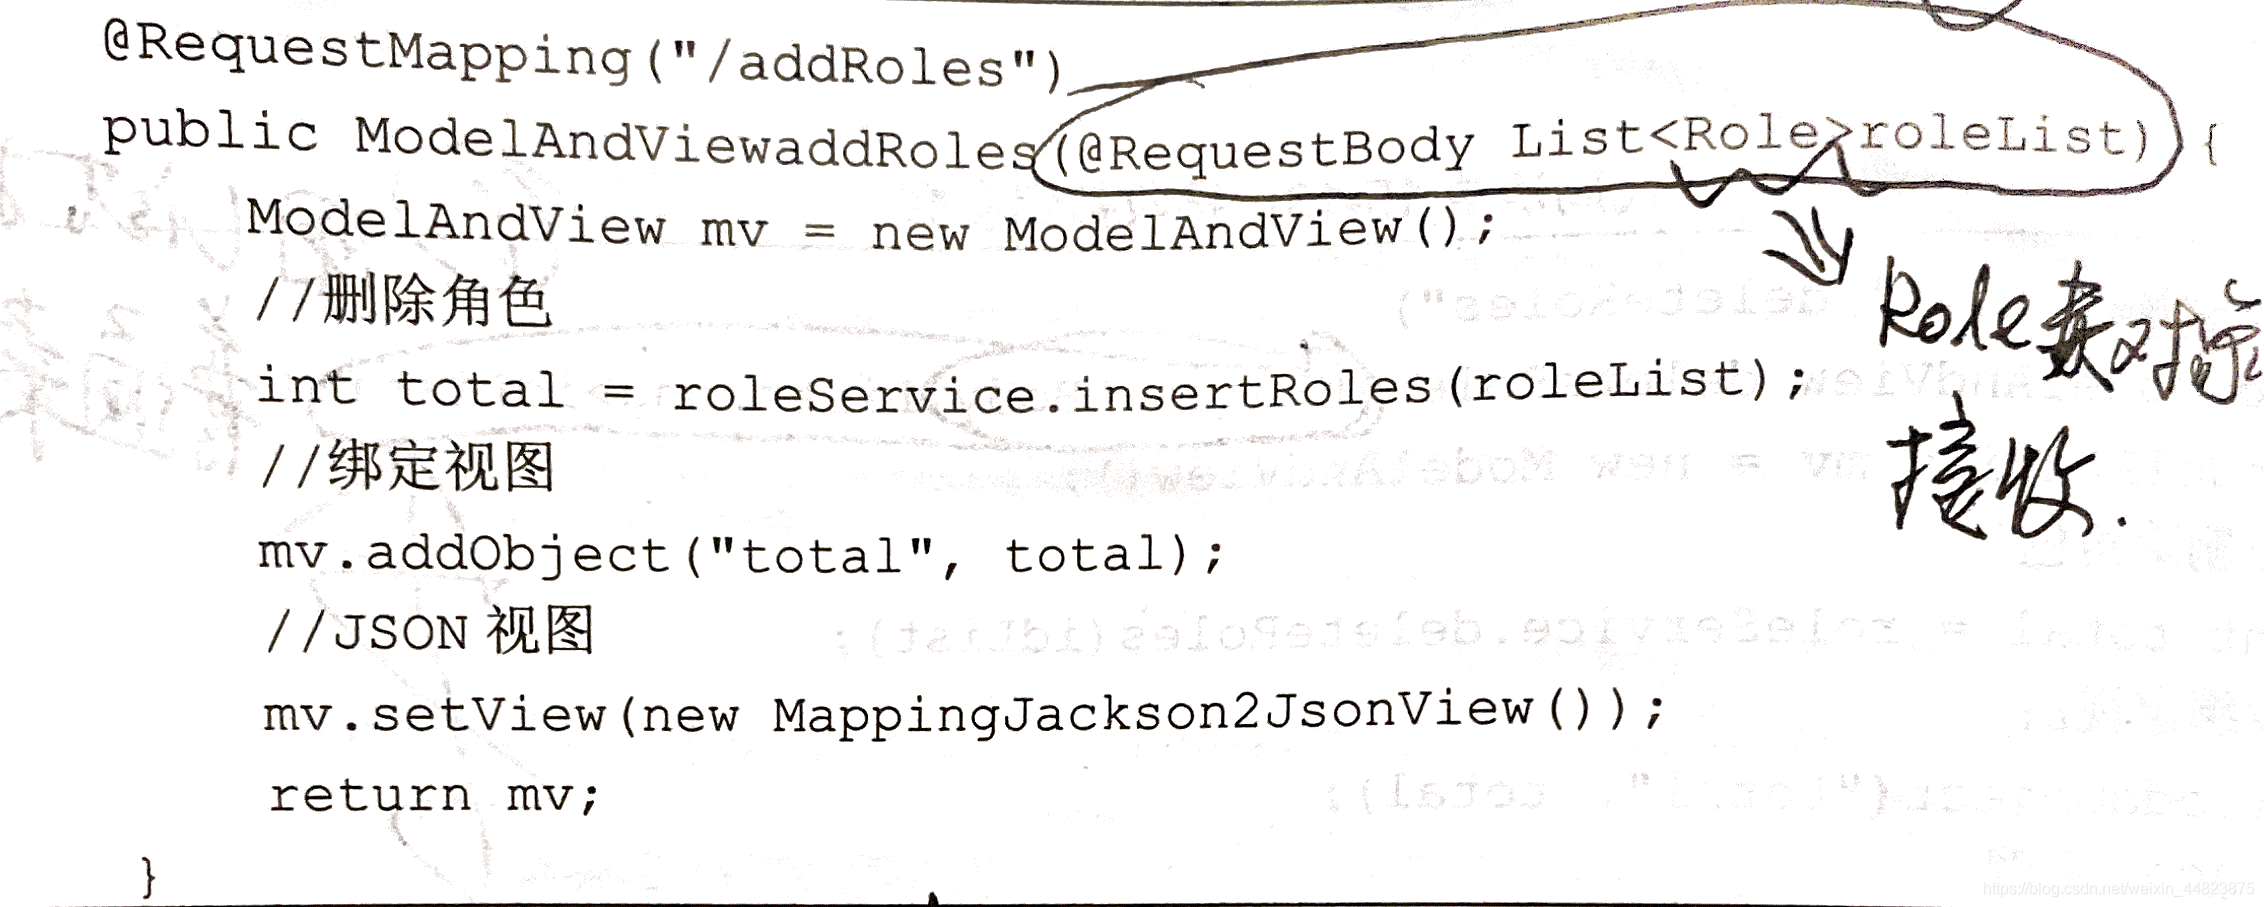
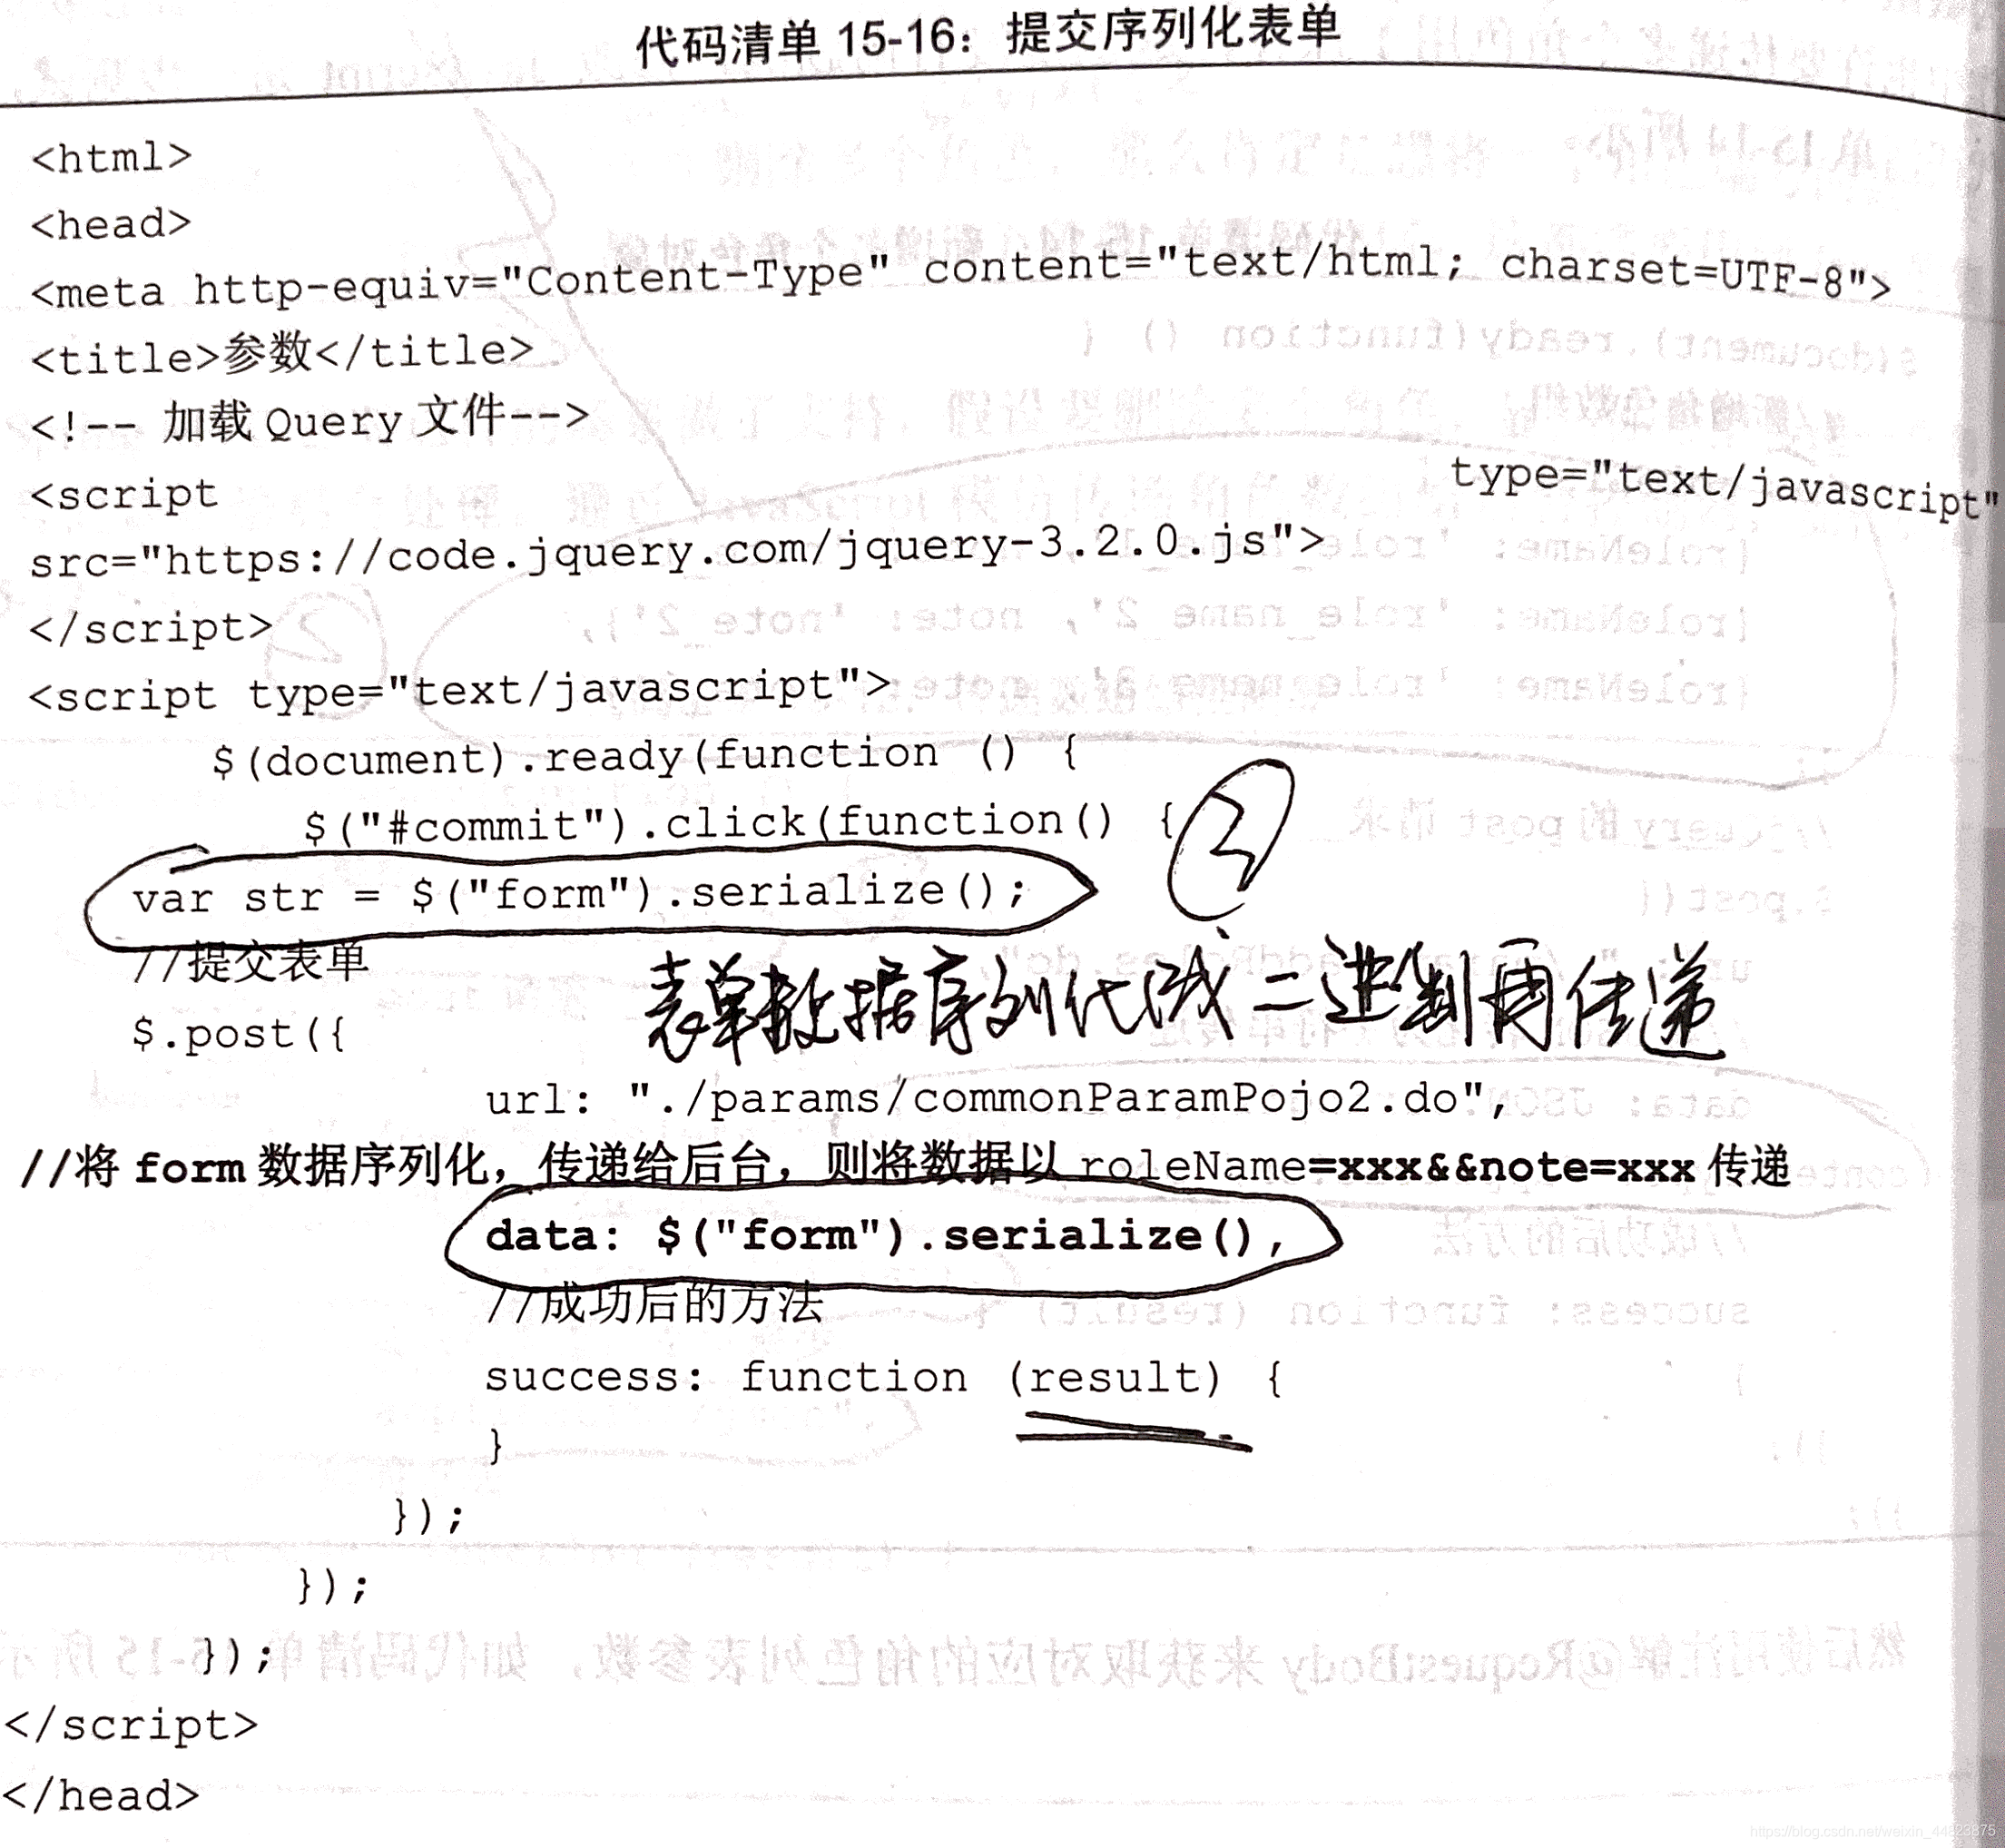
(6)接收列表数据和表单序列化
1:传递数组
(1)JQuery传递数组
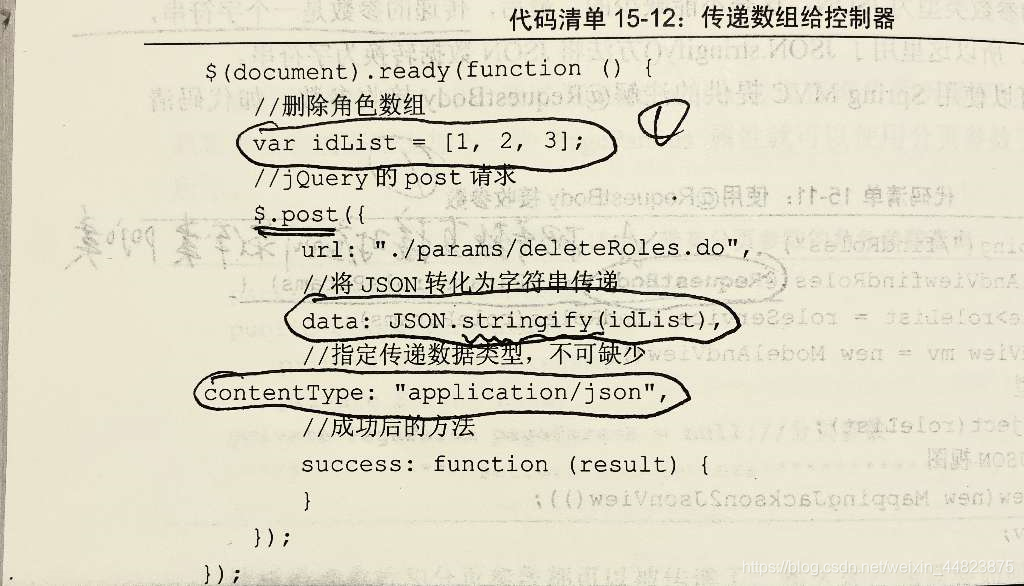
(2)Controller接收数组
2:传递多个角色数组
(1)JQuery传递多个
 (2)Controller接收
3:传递序列化表单
(1)JQuery把表单序列化后再传递
(2)Controller接收
