Cilium Host Routing Mode
Cilium ConfigMap
cilium configmap 是配置cilium的地方:
root@node1:~# kubectl get cm -n kube-system | grep cilium
cilium-config                        34     7d21h
root@node1:~# kubectl edit cm -n kube-system cilium-config
# Please edit the object below. Lines beginning with a '#' will be ignored,
# and an empty file will abort the edit. If an error occurs while saving this file will be
# reopened with the relevant failures.
#
apiVersion: v1
data:
  agent-health-port: "9879"
  auto-direct-node-routes: "False"
  bpf-ct-global-any-max: "262144"
  bpf-ct-global-tcp-max: "524288"
  bpf-map-dynamic-size-ratio: "0.0025"
  cgroup-root: /run/cilium/cgroupv2
  clean-cilium-bpf-state: "false"
  clean-cilium-state: "false"
  cluster-name: default
  custom-cni-conf: "false"
  debug: "True"
  disable-cnp-status-updates: "True"
  enable-bpf-clock-probe: "True"
  enable-bpf-masquerade: "True"
  enable-host-legacy-routing: "False"
  enable-ip-masq-agent: "False"
  enable-ipv4: "True"
  enable-ipv4-masquerade: "True"
  enable-ipv6: "False"
  enable-ipv6-masquerade: "True"
  enable-remote-node-identity: "True"
  enable-well-known-identities: "False"
  etcd-config: |-
    ---
    endpoints:
      - https://192.168.64.8:2379
      - https://192.168.64.9:2379
      - https://192.168.64.10:2379

    # In case you want to use TLS in etcd, uncomment the 'ca-file' line
    # and create a kubernetes secret by following the tutorial in
    # https://cilium.link/etcd-config
    ca-file: "/etc/cilium/certs/ca_cert.crt"

    # In case you want client to server authentication, uncomment the following
    # lines and create a kubernetes secret by following the tutorial in
    # https://cilium.link/etcd-config
    key-file: "/etc/cilium/certs/key.pem"
    cert-file: "/etc/cilium/certs/cert.crt"
  identity-allocation-mode: kvstore
  ipam: kubernetes
  kube-proxy-replacement: probe
  kvstore: etcd
  kvstore-opt: '{"etcd.config": "/var/lib/etcd-config/etcd.config"}'
  monitor-aggregation: medium
  monitor-aggregation-flags: all
  operator-api-serve-addr: 127.0.0.1:9234
  preallocate-bpf-maps: "False"
  sidecar-istio-proxy-image: cilium/istio_proxy
  tunnel: vxlan
kind: ConfigMap
metadata:
  annotations:
    kubectl.kubernetes.io/last-applied-configuration: |
      {"apiVersion":"v1","data":{"agent-health-port":"9879","auto-direct-node-routes":"False","bpf-ct-global-any-max":"262144","bpf-ct-global-tcp-max":"524288","bpf-map-dynamic-size-ratio":"0.0025","cgroup-root":"/run/cilium/cgroupv2","clean-cilium-bpf-state":"false","clean-cilium-state":"false","cluster-name":"default","custom-cni-conf":"false","debug":"False","disable-cnp-status-updates":"True","enable-bpf-clock-probe":"True","enable-bpf-masquerade":"False","enable-host-legacy-routing":"True","enable-ip-masq-agent":"False","enable-ipv4":"True","enable-ipv4-masquerade":"True","enable-ipv6":"False","enable-ipv6-masquerade":"True","enable-remote-node-identity":"True","enable-well-known-identities":"False","etcd-config":"---\nendpoints:\n  - https://192.168.64.8:2379\n  - https://192.168.64.9:2379\n  - https://192.168.64.10:2379\n\n# In case you want to use TLS in etcd, uncomment the 'ca-file' line\n# and create a kubernetes secret by following the tutorial in\n# https://cilium.link/etcd-config\nca-file: \"/etc/cilium/certs/ca_cert.crt\"\n\n# In case you want client to server authentication, uncomment the following\n# lines and create a kubernetes secret by following the tutorial in\n# https://cilium.link/etcd-config\nkey-file: \"/etc/cilium/certs/key.pem\"\ncert-file: \"/etc/cilium/certs/cert.crt\"","identity-allocation-mode":"kvstore","ipam":"kubernetes","kube-proxy-replacement":"probe","kvstore":"etcd","kvstore-opt":"{\"etcd.config\": \"/var/lib/etcd-config/etcd.config\"}","monitor-aggregation":"medium","monitor-aggregation-flags":"all","operator-api-serve-addr":"127.0.0.1:9234","preallocate-bpf-maps":"False","sidecar-istio-proxy-image":"cilium/istio_proxy","tunnel":"vxlan"},"kind":"ConfigMap","metadata":{"annotations":{},"name":"cilium-config","namespace":"kube-system"}}
  creationTimestamp: "2023-07-08T12:42:52Z"
  name: cilium-config
  namespace: kube-system
  resourceVersion: "168401"
  uid: 0fbe4759-a8c4-457b-a06f-5fc6231272b9
具体每个字段的意思可参考:Cilium 配置详解
如果有需要修改的修改保存退出后需要重启cilium-agent生效:
root@node1:~# kubectl rollout restart ds/cilium -n kube-system
重启后进入任意一个cilium-agent容器中:
root@node1:/home/cilium# cilium status
KVStore:                 Ok   etcd: 3/3 connected, lease-ID=797e89450e0683a2, lock lease-ID=797e89450e0b2b6a, has-quorum=true: https://192.168.64.10:2379 - 3.5.4; https://192.168.64.8:2379 - 3.5.4 (Leader); https://192.168.64.9:2379 - 3.5.4
Kubernetes:              Ok   1.24 (v1.24.6) [linux/amd64]
Kubernetes APIs:         ["cilium/v2::CiliumClusterwideNetworkPolicy", "cilium/v2::CiliumNetworkPolicy", "core/v1::Namespace", "core/v1::Node", "core/v1::Pods", "core/v1::Service", "discovery/v1::EndpointSlice", "networking.k8s.io/v1::NetworkPolicy"]
KubeProxyReplacement:    Probe   [enp0s2 192.168.64.8]
Host firewall:           Disabled
CNI Chaining:            none
Cilium:                  Ok   1.12.1 (v1.12.1-4c9a630)
NodeMonitor:             Disabled
Cilium health daemon:    Ok
IPAM:                    IPv4: 5/254 allocated from 10.233.64.0/24,
BandwidthManager:        Disabled
Host Routing:            BPF # 注意这里
Masquerading:            BPF   [enp0s2]   10.233.64.0/24 [IPv4: Enabled, IPv6: Disabled] # 表明只是在enp0s2接口上进行NAT的接口。[两种模式,一种是BPF。一种是在Legacy Mode下使用IPtables]
Controller Status:       43/43 healthy
Proxy Status:            OK, ip 10.233.64.93, 0 redirects active on ports 10000-20000
Global Identity Range:   min 256, max 65535
Hubble:                  Disabled
Encryption:              Disabled
Cluster health:          3/3 reachable   (2023-07-16T10:01:41Z)
Host Routing
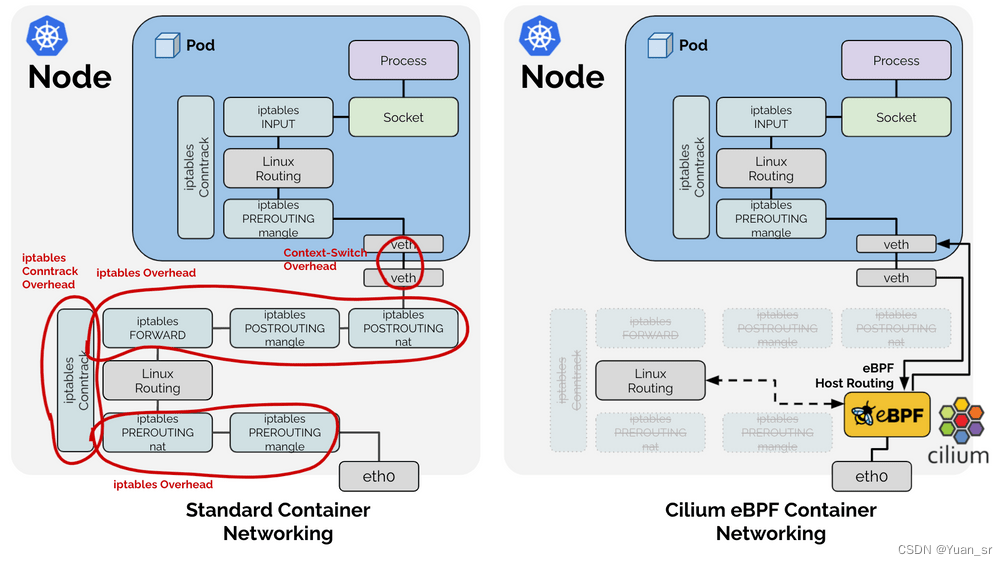
即使 Cilium 使用 eBPF 执行网络路由,默认情况下网络数据包仍会遍历节点的常规网络堆栈的某些部分。 这样可以确保所有数据包仍然遍历所有 iptables hooks,以防你依赖它们。然而,这样会增加大量开销。
在 Cilium 1.9 中引入了基于 eBPF 的 host-routing,来完全绕过 iptables 和上层主机堆栈,与常规 veth 设备操作相比,实现了更快的网络命名空间切换。 如果您的内核支持,此选项会自动启用。

eBPF host-Routing Legacy
Legacy是传统的eBPF host-Routing 模式,左侧是标准的网络流向过程,可以发现iptables 会对包进行处理。
eBPF host-Routing BPF
右侧是启用ebpf host-routing, 直接跨过iptables,必要条件:
 Kernel >= 5.10
 Direct-routing or tunneling
 eBPF-based 替换kube-proxy
 eBPF-based masquerading
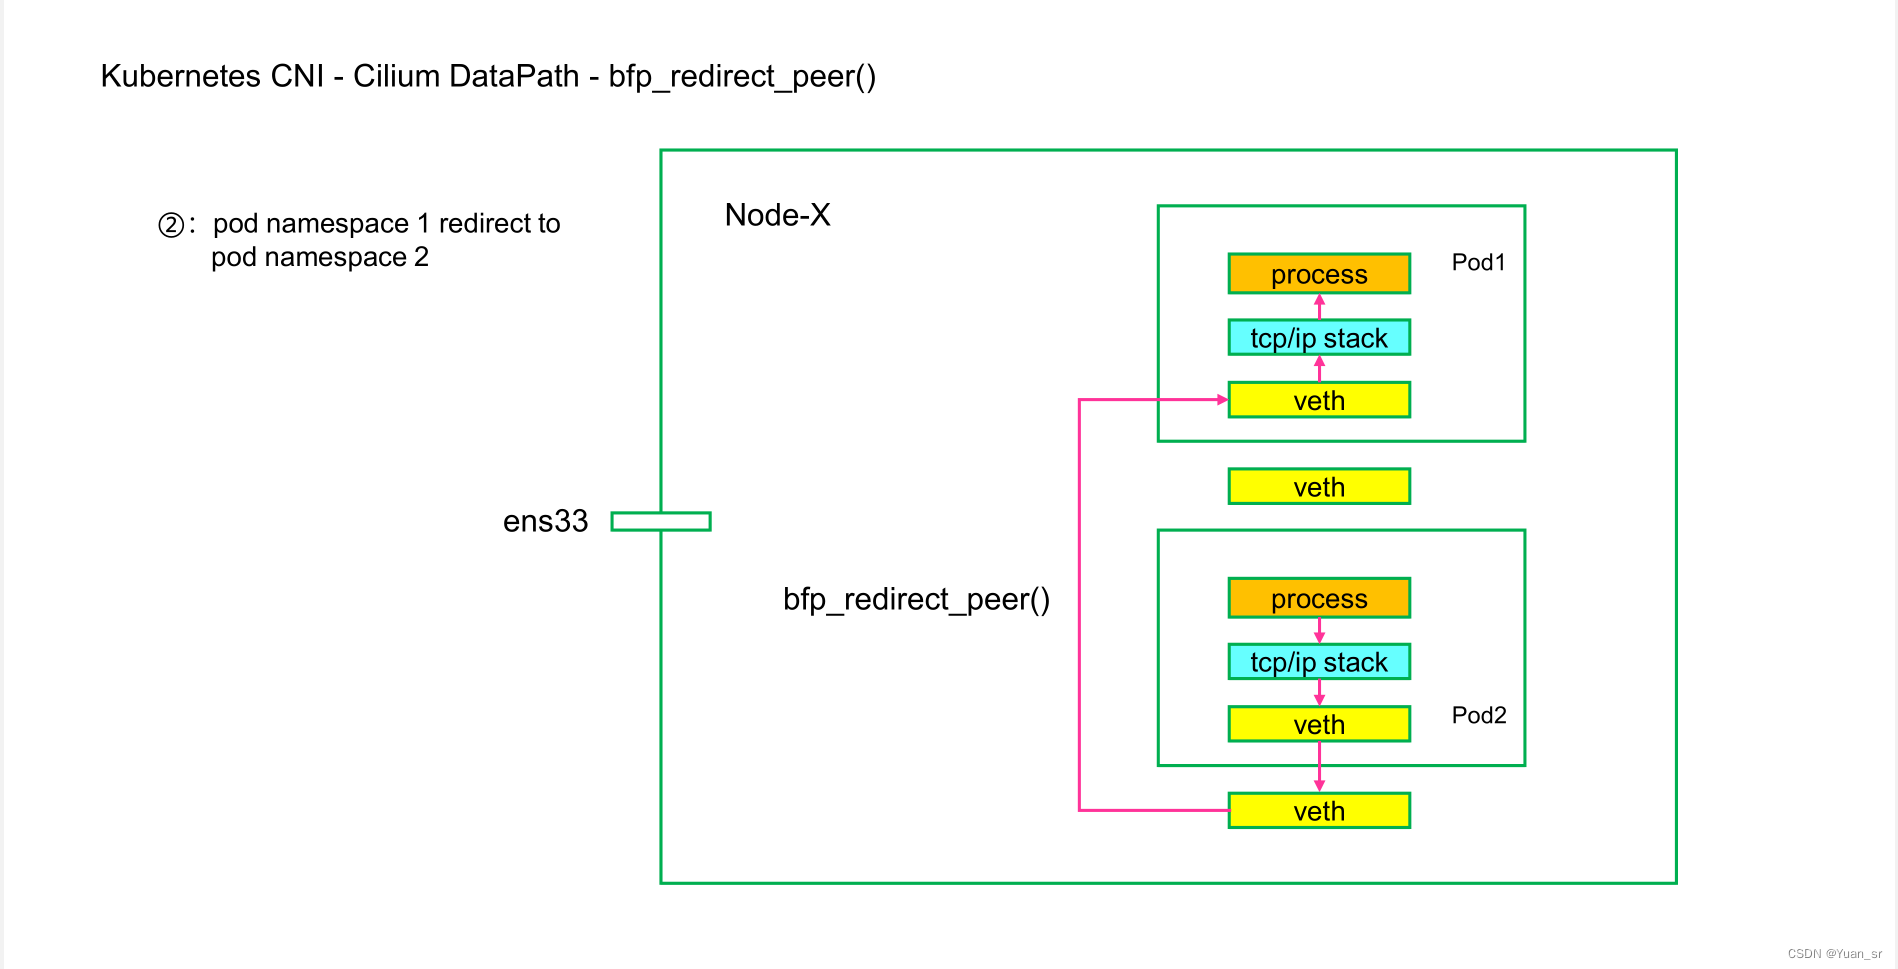
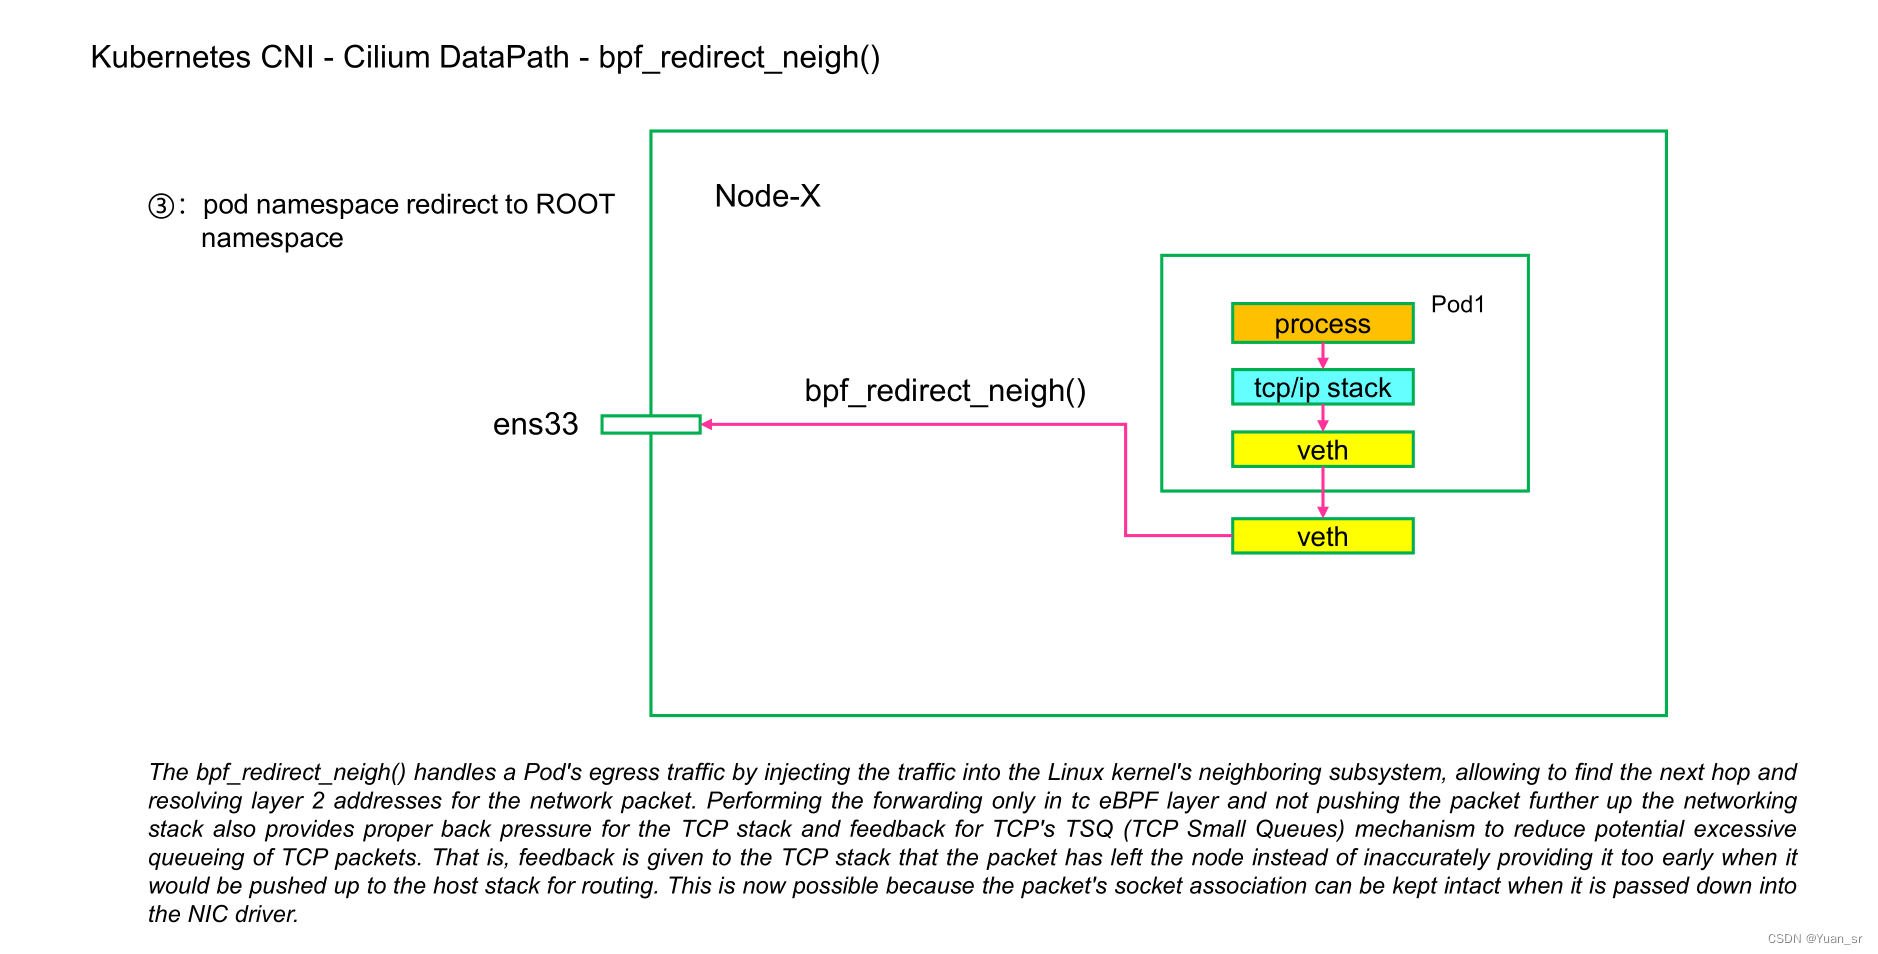
此模式由于引入了两个helper()函数加持了eBPF host-Routing,那么在DataPath上就会有不同的地方:
- bpf_redirect_peer()
简单描述:
同节点的Pod通信时候,Pod-A从自己的veth pair 的lxc出来以后直接送到Pod-B的veth pair的eth0网卡,而绕过Pod-B的veth pair的lxc网卡。

- bpf_redirect_neigh()
简单描述:
不同节点Pod通信的时候,Pod-A从自己的veth pair的lxc出来以后被自己的ingress方向上的from-container处理(vxlan封装或是native routing)然后tail call到vxlan处理然后再走bpf_redirect_neigh()到物理网卡,然后到对端Pod-B所在的Node节点,此时再进行反向处理即可。这里有一点注意:就是from-container —> vxlan 封装 —> bpf_redirect_neigh () 处理。
