基于PyCharm实现串口GUI编程
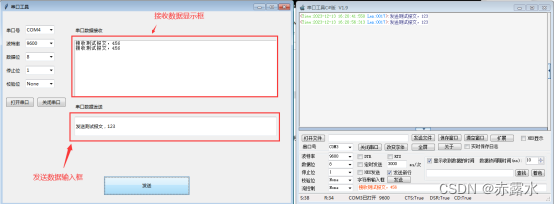
工具效果如下如所示
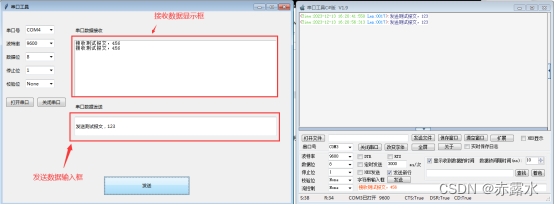
下面简单介绍一下操作流程
1.打开PyCharm软件

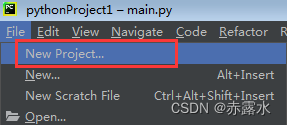
2.创建一个工程
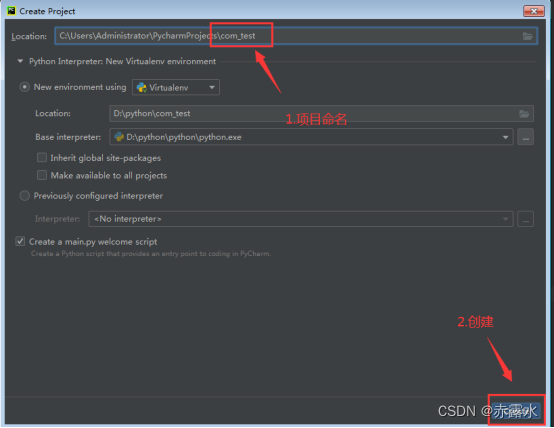
3.给该工程命名
4.在main.py里面黏贴如下的代码
# This is a sample Python script.
# Press Shift+F10 to execute it or replace it with your code.
# Press Double Shift to search everywhere for classes, files, tool windows, actions, and settings.
import serial
import threading
import time

from tkinter import *
from tkinter.ttk import *
from tkinter import messagebox

def open_serial(a,b,c,d,e):
    global ser
    print("串口号:",a)
    print("波特率:",int(b))
    print("数据位:",c)
    print("停止位:",d)
    print("检验位:",e)

    bytesize = serial.EIGHTBITS
    if c == '7':
        bytesize = serial.SEVENBITS
        print("select SEVENBITS")
    if c == '6':
        bytesize = serial.SIXBITS
        print("select SIXBITS")
    if c == '5':
        bytesize = serial.FIVEBITS
        print("select FIVEBITS")

    stopbitsize = serial.STOPBITS_ONE
    if d == '2':
        stopbitsize = serial.STOPBITS_TWO
        print("select STOPBITS_TWO")

    paritysel = serial.PARITY_NONE
    if e == 'Odd':
        paritysel = serial.PARITY_ODD
        print("select Odd")
    if e == 'Even':
        paritysel = serial.PARITY_EVEN
        print("select EVEN")

    ser=serial.Serial(port=a,baudrate=int(b),bytesize=bytesize,stopbits=stopbitsize,parity=paritysel,timeout=0.5)
 #   ser = serial.Serial('COM4', 9600, timeout=1)

def print_hi(name):
    # Use a breakpoint in the code line below to debug your script.
    print(f'Hi, {name}')  # Press Ctrl+F8 to toggle the breakpoint.

def print_log(log):
    time_start = time.time()
    date = time.strftime("%Y-%m-%d %H:%M:%S", time.localtime())
    print(f'{date}-{log}')

def recv_hander():
    while 1:
         if ser.is_open:
            data = ser.read(1024).decode('gbk')
            print_log(data)
            msgshow.insert(END, data)

def create_recv_thread():
    global th
    th = threading.Thread(target=recv_hander)
    th.setDaemon(True)
    th.start()

def msg_send():
    msg = msginp.get()
    print_log(f'send==>{msg}')
    if ser.is_open:
        ser.write(msg.encode('gbk'))

def open_com():
    print_log("open com")
    com_val = comnum.get()
    baud_val = baud.get()  # 获取当前选定项目的值
    databit_val = databit.get()
    stopbit_var = stopbit.get()
    parity_var = parity.get()
    print(com_val)
    print(baud_val)

    open_serial(com_val, baud_val, databit_val, stopbit_var, parity_var)
    if ser.is_open:
        messagebox.showinfo("标题","串口打开成功")
        create_recv_thread()

def close_com():
    print_log("close com")
    if ser.is_open:
        ser.close()

# Press the green button in the gutter to run the script.
if __name__ == '__main__':
    print_hi('PyCharm')

    root = Tk()
    root.geometry('768x512')
    root.title('串口工具')

    comnumvar = StringVar()
    baudvar = StringVar()
    databitvar = StringVar()
    stopbitvar = StringVar()
    parityvar = StringVar()

    lb_com = Label(root, text='串口号')
    lb_com.place(relx=0.01, rely=0.05, relwidth=0.1, relheight=0.1)
    comnum = Combobox(root, textvariable=comnumvar, values=['COM1', 'COM2', 'COM3', 'COM4', ])
    comnum.place(relx=0.08, rely=0.075, relwidth=0.1)
    comnum.current(3)

    lb_baud = Label(root, text='波特率')
    lb_baud.place(relx=0.01, rely=0.12, relwidth=0.1, relheight=0.1) #add 0.045
    baud = Combobox(root, textvariable=baudvar, values=['115200', '38400', '9600', '4800', ])
    baud.place(relx=0.08, rely=0.145, relwidth=0.1) #add 0.025
    baud.current(2)

    lb_databit = Label(root, text='数据位')
    lb_databit.place(relx=0.01, rely=0.19, relwidth=0.1, relheight=0.1)  #add 0.045
    databit = Combobox(root, textvariable=databitvar, values=['8', '7', '6', '5', ])
    databit.place(relx=0.08, rely=0.215, relwidth=0.1)     #add 0.025
    databit.current(0)

    lb_stopbit = Label(root, text='停止位')
    lb_stopbit.place(relx=0.01, rely=0.26, relwidth=0.1, relheight=0.1)
    stopbit = Combobox(root, textvariable=stopbitvar, values=['1', '2', ])
    stopbit.place(relx=0.08, rely=0.285, relwidth=0.1)
    stopbit.current(0)

    lb_parity = Label(root, text='校验位')
    lb_parity.place(relx=0.01, rely=0.33, relwidth=0.1, relheight=0.1)
    parity = Combobox(root, textvariable=parityvar, values=['None','Odd','Even',])
    parity.place(relx=0.08, rely=0.355, relwidth=0.1)
    parity.current(0)

    btnopen = Button(root, text='打开串口', command=open_com)
    btnopen.place(relx=0.01, rely=0.45, relwidth=0.1, relheight=0.05)

    btnclose = Button(root, text='关闭串口', command=close_com)
    btnclose.place(relx=0.12, rely=0.45, relwidth=0.1, relheight=0.05)

    lb1 = Label(root, text='串口数据接收')
    lb1.place(relx=0.25, rely=0.05, relwidth=0.7, relheight=0.1)

    msgshow = Text(root)
    msgshow.place(relx=0.25, rely=0.15, relwidth=0.7, relheight=0.3)

    lb2 = Label(root, text='串口数据发送')
    lb2.place(relx=0.25, rely=0.45, relwidth=0.7, relheight=0.1)
    msginp = Entry(root)
    msginp.place(relx=0.25, rely=0.55, relwidth=0.7, relheight=0.1)

    btnsend = Button(root, text='发送', command=msg_send)
    btnsend.place(relx=0.35, rely=0.86, relwidth=0.3, relheight=0.1)

    root.mainloop()

# See PyCharm help at https://www.jetbrains.com/help/pycharm/
5.执行脚本

6.如果有提示“No module named 'serial”,需要安装 pyserial,在终端命令行输入:pip install pyserial,如下图所示:

7.在windows下安装一对虚拟串口,可以下载vspd安装,最终结果如下所示:

8.使用第三方工具进行数据互发测试
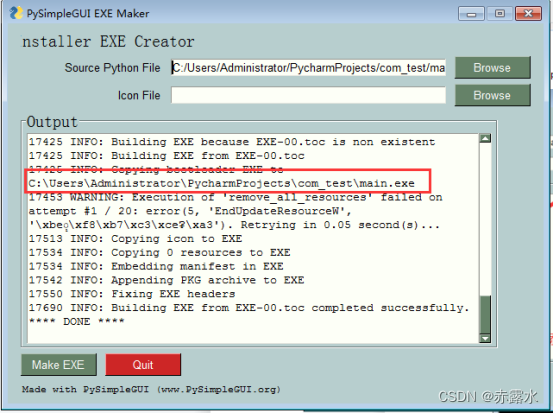
9.将该工具打包成exe可执行文件
在命令行终端输入:python -m pysimplegui-exemaker.pysimplegui-exemaker
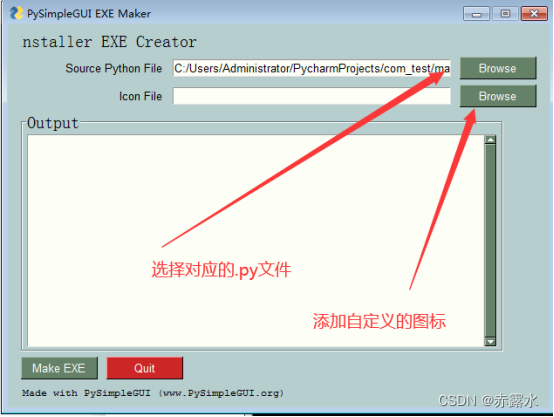
最后点击“Make EXE”,生成如下所示的exe文件
