shell脚本合集、练习题(附答案)
1.查找网关 dns IP地址
[root@localhost net_subject]# cat showip.sh
#!/bin/bash

# 显示网卡的ip地址
#ip add|grep "\<inet\>"|awk '{print "网卡"$NF"的ip是"$2}'
# 除去本地回环地址的ip
ip add|grep "\<inet\>"|grep -v "\<lo\>"|awk '{print "网卡"$NF"的ip是"$2}'
# 显示默认网关
ip route|grep "default"|awk '{print "默认网关是"$3}'
# 显示DNS服务器
cat /etc/resolv.conf |grep "nameserver"|sed -n '1p'|awk '{print "首选DNS是"$2}'
sec=$(cat /etc/resolv.conf |grep "nameserver"|sed -n '2p'|awk '{print "备用DNS是"$2}')
# 判断有误备用DNS服务器
if [[ -z "$sec" ]] ; then
	echo "无备用DNS"
else
	echo "$sec"
fi

# 赋予可执行权限
#chmod +x showip.sh

# 复制进PATH变量的目录,以方便使用
#cp -p showip.sh /bin

# 起别名
#alias showip=showip.sh
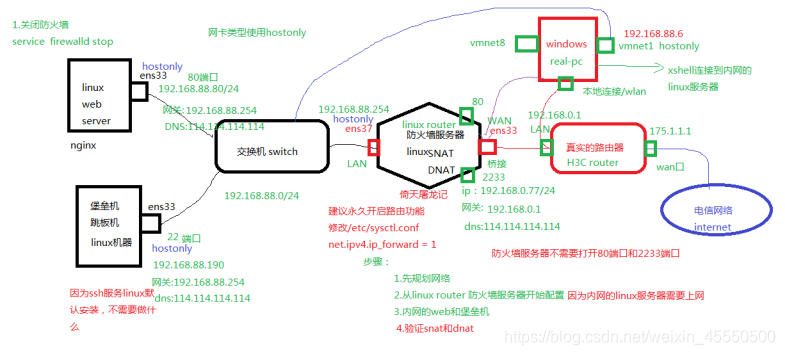
2.根据拓扑图 使堡垒机和web/ssh服务器能够上网,且访问router服务器能80端口能访问web服务器的nginx,ssh连接router服务器ip地址2233端口,是转换到堡垒机的。
拓扑图如下:
脚本代码:
[root@sc 1-23]# cat iptables-snat-dnat.sh
#!/bin/bash

#停止firewalld服务
service  firewalld stop
#清除下iptables里的规则
iptables -t nat -F
iptables  -F
#disabled  selinux
setenforce  0
sed  -i  '/^SELINUX=/  s/enforcing/disabled/' /etc/sysconfig/selinux
#开启路由功能
echo 1 >/proc/sys/net/ipv4/ip_forward

#配置SNAT策略,实现snat功能,将所有内网是192.168.88.0这个网段的ip包的源ip修改为192.168.0.77
iptables  -t  nat  -A POSTROUTING  -s  192.168.88.0/24 -o ens33 -j SNAT --to-source 192.168.0.77

#配置DNAT策略,发布内网的web服务器192.168.88.80
iptables  -t nat  -A  PREROUTING  -d 192.168.0.77 -p tcp  --dport 80 -i ens33 -j DNAT  --to-destination  192.168.88.80
#配置DNAT策略,发布内网的ssh堡垒机192.168.88.190,访问防火墙机器的2233端口转发到内网的192.158.50.2的22号端口
iptables  -t nat  -A  PREROUTING  -d 192.168.0.77 -p tcp  --dport 2233 -i ens33 -j DNAT  --to-destination  192.168.88.190:22
结果:
[root@sc 1-23]# iptables -L -t nat -n
Chain PREROUTING (policy ACCEPT)
target     prot opt source               destination
DNAT       tcp  --  0.0.0.0/0            192.168.0.77         tcp dpt:80 to:192.168.88.80
DNAT       tcp  --  0.0.0.0/0            192.168.0.77         tcp dpt:2233 to:192.168.88.190:22

Chain INPUT (policy ACCEPT)
target     prot opt source               destination

Chain POSTROUTING (policy ACCEPT)
target     prot opt source               destination
SNAT       all  --  192.168.88.0/24      0.0.0.0/0            to:192.168.0.77

Chain OUTPUT (policy ACCEPT)
target     prot opt source               destination
3.编写一个清除iptables规则。
注意:默认规则是不会被清除的
[root@web-server ~]# cat clear_iptables.sh
#!/bin/bash

#清除filter和nat表里的规则
iptables  -t filter -F
iptables -t nat -F

#设置filter表的INPUT链的默认策略为ACCEPT
iptables -t filter -P INPUT  ACCEPT
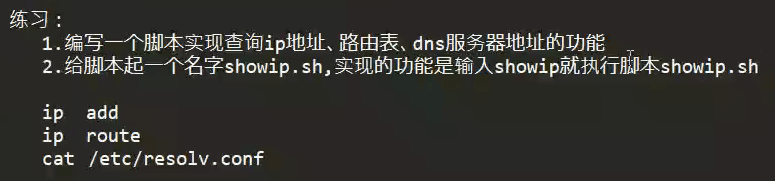
练习:
	1.运行192.168.0.0/24(可以根据你家里上网的网段修改)网段的主机访问本机的web、ftp、ssh、mysql服务
	-s 192.168.0.0/24
	ssh 22  tcp
	ftp 21  tcp
	mysql 3306   tcp
	nginx  80  443   tcp

	2.允许任何人都可以访问本机的dns服务--》53 udp
	3.禁止其他的电脑ping本机,但是本机可以ping其他电脑
	4.默认的INPUT链规则设置为DROP
	5.所有的规则生效后要保存,同时如果重启机器,希望也是生效的
脚本:
[root@web-server ~]# cat open_port_iptables.sh
#!/bin/bash

#初始化iptables的规则
iptables -t filter  -F
iptables -t nat -F

#设置INPUT链默认的策略为DROP
iptables -P INPUT DROP

#open  ssh
iptables -A INPUT  -s 192.168.0.0/24 -p tcp  --dport 22 -j ACCEPT

#open nginx  80 443
iptables -A INPUT  -p tcp --dport 80 -j ACCEPT
iptables -A INPUT  -p tcp --dport 443 -j ACCEPT

#open mysql 3306
iptables  -A INPUT -p tcp  --dport 3306 -j ACCEPT
#open dns 53 udp
iptables  -A INPUT -p udp  --dport 53 -j ACCEPT

#open ftp 21
iptables  -A INPUT -p tcp  --dport 21 -j ACCEPT

#ping
iptables  -A INPUT -p icmp  --icmp-type 8 -j DROP
iptables -A INPUT -p icmp --icmp-type 0 -j ACCEPT

[root@web-server ~]#

[root@web-server ~]# iptables-save >/etc/sysconfig/iptables-config

如何开机让linux系统去加载保存的iptables规则?
[root@localhost ~]# chmod +x /etc/rc.d/rc.local
写到/etc/rc.local文件里
iptables-restore < /etc/sysconfig/iptables-config
[root@localhost ~]#
5.写一个关于一个判断进程起了没有?
6.写个脚本执行mysql语句
#!/bin/bash

mysql -uroot -p'Sanchuang123#' <<EOF
create database jiangzihan2;
use jiangzihan2;
create table student(id int);
insert into student(id) values(1),(6),(9);
select * from student;
EOF
echo "查询的结果如上:"