华为欧拉安装部署:Oracle11g
| 一、环境准备 |
1、下载安装低版本的libaio包;libaio版本太高,会造成编译错误
查看libaio1库版本不能大于0.3.109
[oracle@s3 install]$ rpm -qa libaio
libaio-0.3.110-12.el8.x86_64

# 查看欧拉操作系统版本
[oracle@localhost bin]$ cat /etc/os-release
NAME="openEuler"
VERSION="22.03 (LTS-SP1)"
ID="openEuler"
VERSION_ID="22.03"
PRETTY_NAME="openEuler 22.03 (LTS-SP1)"
ANSI_COLOR="0;31"
# 下载
wget http://mirrors.ustc.edu.cn/centos/7.9.2009/os/x86_64/Packages/libaio-0.3.109-13.el7.x86_64.rpm

# 备份原来的libaio.so.1
mv /usr/lib64/libaio.so.1.0.1 /usr/lib64/libaio.so.1.0.120240103

# 解压
rpm2cpio libaio-0.3.109-13.el7.x86_64.rpm |cpio -idmv

# 把解压后的文件拷贝到/usr/lib64下
cp -r /root/lib64/libaio.so.1 /usr/lib64
mv /root/lib64/libaio.so.1.0.1 /usr/lib64
2、修改系统时间
[root@localhost ~]# date -s “2022-05-09 09:11:40”

[root@localhost ~]# hwclock -w
3、修改host,绑定主机名
修改 vim /etc/hosts文件
[root@localhost ~]# hostname
localhost.localdomain
[root@localhost ~]# vim /etc/hosts
192.168.9.138    localhost.localdomain
4、关闭selinux,设置SELINUX= enforcing 为SELINUX=disabled
setenforce 0
vim /etc/selinux/config
命令方式:
	sed -i 's/SELINUX=enforcing/SELINUX=disabled/g' /etc/selinux/config
5、关闭防火墙
systemctl stop firewalld
systemctl disable firewalld
| 二、安装配置 |
2.1、安装依赖
在线安装
yum install -y binutils compat-libcap1 compat-libstdc++-33 gcc gcc-c++ glibc glibc-devel ksh libaio libaio-devel libgcc libstdc++ libstdc++-devel libXi libXtst make sysstat elfutils-libelf-devel unixODBC unixODBC-devel numactl-devel elfutils-libelf-devel-static pcre-devel

离线安装:先找台公网机器下载
yum -y install binutils compat-libcap1 compat-libstdc++-33 gcc gcc-c++ glibc glibc-devel ksh libaio libaio-devel libgcc libstdc++ libstdc++-devel libXi libXtst make sysstat elfutils-libelf-devel unixODBC unixODBC-devel numactl-devel elfutils-libelf-devel-static pcre-devel --downloadonly --downloaddir /root/rpm
2.2、添加oinstall 、dba 组,新建oracle用户并加入oinstall、dba组中
groupadd oinstall
groupadd dba
useradd -g oinstall -G dba oracle
passwd oracle
[root@localhost ~]# id oracle
2.3、修改内核参数
[root@localhost db]# vim /etc/sysctl.conf

(在文件末尾添加)内容如下:

fs.aio-max-nr = 1048576
fs.file-max = 6815744
kernel.shmall = 2097152
kernel.shmmax = 536870912
kernel.shmmni = 4096
kernel.sem = 250 32000 100 128
net.ipv4.ip_local_port_range = 9000 65500
net.core.rmem_default = 262144
net.core.rmem_max = 4194304
net.core.wmem_default = 262144
net.core.wmem_max = 1048576

让参数生效:
/sbin/sysctl -p

2.4、配置Oracle用户参数
[root@localhost /]# vim /etc/security/limits.conf

(在文件末尾添加)内容如下:
oracle soft nproc 2047
oracle hard nproc 16384
oracle soft nofile 1024
oracle hard nofile 65536
oracle soft stack 10240
2.5、修改/etc/pam.d/login 文件
[root@localhost ~]# vim /etc/pam.d/login

(在文件末尾添加)内容如下:
session  required   /lib64/security/pam_limits.so
session  required   pam_limits.so
2.6、修改/etc/profile 文件
[root@localhost ~]# vim /etc/profile
在如下位置添加:
……
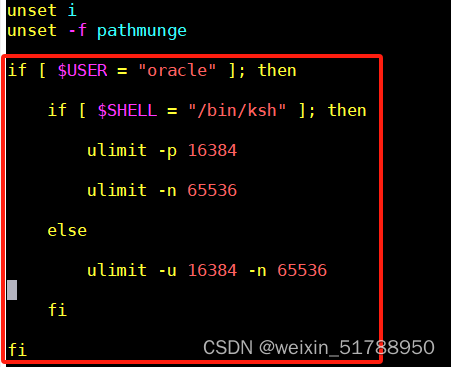
unset i
unset -f pathmunge

if [ $USER = "oracle" ]; then

    if [ $SHELL = "/bin/ksh" ]; then

        ulimit -p 16384

        ulimit -n 65536

    else

        ulimit -u 16384 -n 65536

    fi

fi
使之生效:
source /etc/profile

2.7、创建安装目录app&&静默安装目录etc
[root@localhost home]# mkdir -p /apps/oracle/app/
[root@localhost home]# mkdir -p /apps/oracle/etc/
[root@localhost home]# chown -R oracle:oinstall /apps/oracle
[root@localhost home]# chmod 775 /apps/oracle
2.8、上传oracle安装包到:/apps/oracle/app/下,并解压,会生成一个database目录
unzip p13390677_112040_Linux-x86-64_1of7.zip
unzip p13390677_112040_Linux-x86-64_2of7.zip
拷贝/apps/oracle/app/database/response的.rsp文件到/apps/oracle/etc/目录下
2.9、添加环境变量
# 切换oracle用户
su  oracle

编辑环境变量,并生效
[oracle@localhost ~]$ vim /home/oracle/.bash_profile
[oracle@localhost ~]$ source .bash_profile

内容如下:
PATH=$PATH:$HOME/.local/bin:$HOME/bin
# oracle安装目录
export ORACLE_BASE=/apps/oracle/app
export ORACLE_HOME=$ORACLE_BASE/product/11.2.0
# oracle实例SID名称
export ORACLE_SID=xwtechdb
# 同SID
export ORACLE_TERM=xwtechdb
export PATH=$ORACLE_HOME/bin:/usr/sbin:$PATH
export LD_LIBRARY_PATH=$ORACLE_HOME/lib:/lib:/usr/lib
export LANG=C
export NLS_LANG=AMERICAN_AMERICA.AL32UTF8
# 同SID
export ORACLE_UNQNAME=xwtechdb
export PATH=$ORACLE_HOME/bin:$PATH
export PATH
export SQLPATH=/apps/oracle/labs
| 三、部署 |
3.1、编辑/apps/oracle/etc/目录下db_install.rsp(根据实际编写)
oracle.install.responseFileVersion=/oracle/install/rspfmt_dbinstall_response_schema_v11_2_0
oracle.install.option=INSTALL_DB_SWONLY
ORACLE_HOSTNAME=localhost
UNIX_GROUP_NAME=oinstall
INVENTORY_LOCATION=/apps/oracle/app/oraInventory
SELECTED_LANGUAGES=en,zh_CN,zh_TW
ORACLE_HOME=/apps/oracle/app/product/11.2.0
ORACLE_BASE=/apps/oracle/app
oracle.install.db.InstallEdition=EE
oracle.install.db.EEOptionsSelection=false
oracle.install.db.DBA_GROUP=dba
oracle.install.db.OPER_GROUP=oinstall
oracle.install.db.config.starterdb.characterSet=AL32UTF8
oracle.install.db.config.starterdb.memoryOption=true
oracle.install.db.config.starterdb.memoryLimit=
oracle.install.db.config.starterdb.installExampleSchemas=false
oracle.install.db.config.starterdb.enableSecuritySettings=true
DECLINE_SECURITY_UPDATES=true
3.2、安装数据库
3.2.1、在路径:/apps/oracle/app/database下执行命令
./runInstaller -silent -force -responseFile /apps/oracle/etc/db_install.rsp -ignorePrereq

3.2.2、切换root用户,执行root.sh
[root@localhost database]$ sh /apps/oracle/app/product/11.2.0/root.sh
3.3、配置监听文件,并执行安装
3.3.1、编辑/apps/oracle/etc/目录下netca.rsp
[oracle@localhost database]$ vim /apps/oracle/etc/netca.rsp

(文件末尾添加)
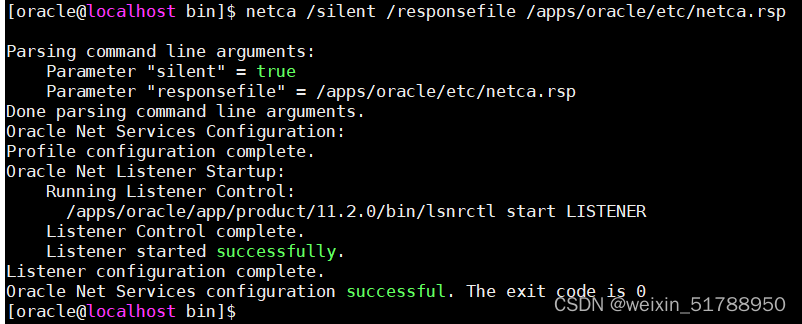
Parsing command line arguments:
Parameter "silent" = true
Parameter "responsefile" = /apps/oracle/etc/netca.rsp
Done parsing command line arguments.
Oracle Net Services Configuration:
Profile configuration complete.
Oracle Net Listener Startup:
Running Listener Control:
/apps/oracle/app/product/11.2.0/bin/lsnrctl start LISTENER  # 实际安装目录
Listener Control complete.
Listener started successfully.
Listener configuration complete.
Oracle Net Services configuration successful. The exit code is 0
3.3.2、安装:
cd /apps/oracle/app/product/11.2.0/bin
netca /silent /responsefile /apps/oracle/etc/netca.rsp

3.4、启动监听
先查看lsnrctl文件大小是否为0,如果为0,考虑lib64.so.1文件是否安装低版本
[oracle@localhost bin]$ ls -l lsnrctl
-rwxr-x--x 1 oracle oinstall 158440 Jan  3 13:53 lsnrctl
[oracle@localhost bin]$

# 启动监听
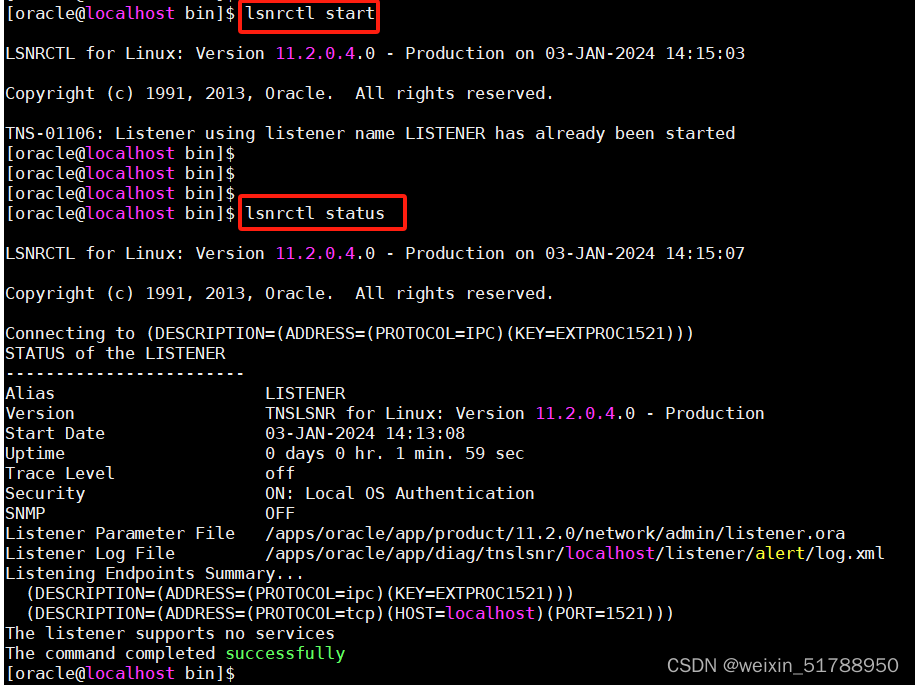
[oracle@localhost bin]$ lsnrctl start

LSNRCTL for Linux: Version 11.2.0.4.0 - Production on 03-JAN-2024 14:15:03

Copyright (c) 1991, 2013, Oracle.  All rights reserved.

TNS-01106: Listener using listener name LISTENER has already been started

3.5、静默建库
3.5.1、编辑文件:vim /apps/oracle/etc/dbca.rsp
[GENERAL]
RESPONSEFILE_VERSION = "11.2.0"
OPERATION_TYPE = "createDatabase"
[CREATEDATABASE]
GDBNAME = "xwtechdb"         #数据库的名字,与环境变量配置保持一致
SID = "xwtechdb"             #对应的实例名字,与环境变量配置保持一致
SYSPASSWORD = "sysdba"         #SYS管理员密码
SYSTEMPASSWORD = "sysdba"     #SYSTEM管理员密码
SYSMANPASSWORD = "sysdba"
DBSNMPPASSWORD = "sysdba"
CHARACTERSET = "ZHS16GBK"
3.5.2、执行建库命令:
cd /apps/oracle/app/product/11.2.0/bin
dbca -silent -responseFile /apps/oracle/etc/dbca.rsp

3.6、启动
# 复制启动文件:$oracle_base的pfile下的init.ora文件到$oracle_home的dbs下为init(数据库名).ora
cp /apps/oracle/app/admin/orcl11g/pfile/init.ora.032024142145 /apps/oracle/app/product/11.2.0/dbs/initxwtechdb.ora

# 启动
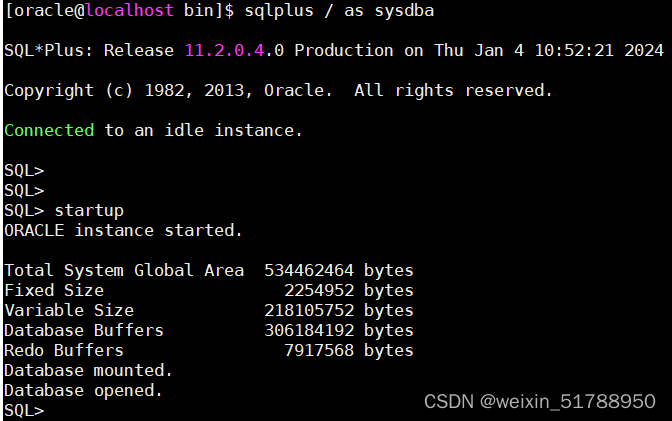
[oracle@localhost bin]$ sqlplus / as sysdba
SQL> startup
ORACLE instance started.

Total System Global Area  534462464 bytes
Fixed Size                  2254952 bytes
Variable Size             218105752 bytes
Database Buffers          306184192 bytes
Redo Buffers                7917568 bytes
Database mounted.
Database opened.
SQL>

| 遇到错误: |
SQL> startup
ORACLE instance started.

Total System Global Area  534462464 bytes
Fixed Size                  2254952 bytes
Variable Size             218105752 bytes
Database Buffers          306184192 bytes
Redo Buffers                7917568 bytes
ORA-01102: cannot mount database in EXCLUSIVE mode
启动失败参考文档
https://blog.csdn.net/lzwgood/article/details/26368323